
Curly Natural Bun Styles for Everyday
Curly natural bun styles are a practical way to keep textured curls gathered and defined through busy daily routines. Written for women who want mindful hair care, this guide from BabunobGem explores step-by-step bun techniques, accessory comparisons, and gentle, low-tension habits that celebrate your natural curl shape.
Key highlights
- Tips for working with natural curl clumps instead of flattening them at the roots.
- Ideas for spreading tension and keeping a bun looser at the roots.
- Compares fabric scrunchies, linen wraps, and claw clips for everyday buns.
- Offers practical techniques to transition second- and third-day curls with minimal effort.
Curly Natural Bun Fundamentals: Textures, Shapes, and Hold Mechanics
A curly natural bun relies on gentle structural support rather than tight pulling, using the organic volume and friction of textured strands to stay secure. By choosing wide fabric fasteners and working with natural curl clumps, you can keep tension lower and help curl definition last through the day.
Textured hair possesses unique structural mechanics that set it apart from straight hair. Each strand emerges from an asymmetrical follicle, creating an elliptical cross-section that twists as it grows. The cuticle scales along the outer perimeter of these curves naturally lift slightly, which gives curly hair its signature body, spring, and tactile surface. Because of this natural texture, curly hair creates self-anchoring friction when gathered together, meaning you do not need extreme tension or tight elastic bands to keep a bun in place.
When you style a natural curly hair bun, the goal is to cooperate with this organic geometry rather than fighting it. Forcing curls into flat, compressed shapes disrupts curl clumping—the tendency of individual strands to align into defined, cohesive spirals or waves. Preserving these clumps helps keep the interior of the bun airy, can reduce tangled matting, and helps your hair look vibrant and dimensional rather than severely tied back.
Categorizing Curl Patterns for Everyday Bun Silhouettes
Understanding where your hair falls on the curl spectrum helps you choose the right height, volume, and fastening method for your daily bun. Wavy hair (Type 2A to 2C) features an open S-pattern that can easily lose volume if compressed under heavy accessories. For waves, a mid-height gathered bun or a loose chignon supported by a soft fabric tie can maintain crown height without flattening the crest of each wave. For more options, see our guide to hair ties for curls and how they sit on textured hair.
Type 3 curls (3A to 3C) feature defined loops, ringlets, and corkscrews with considerable natural spring. These curls often hold bun shapes well because the spirals interlock gently. High crown placements, such as pineapple styles, allow the ends of Type 3 curls to cascade softly while limiting tension along the nape. Meanwhile, Type 4 coily strands (4A to 4C) showcase dense, tight zig-zag patterns with significant shrinkage and delicate cuticle layers. For coily hair, an everyday curls with bun arrangement can work as a protective style, tucking fragile ends inward and away from fabric friction.
Tension Distribution and Scalp Wellness
One of the most critical aspects of wearing a daily bun is managing perimeter tension. When hair is drawn tightly toward a single anchor point, the follicles along the hairline, temples, and crown bear continuous mechanical pull. Hair pulled back tightly over and over can cause traction alopecia, a type of hair loss along the hairline.
To avoid this strain, everyday styling should emphasize wide tension distribution. Fasteners covered in soft fabrics, such as natural linen or smooth cotton, can spread pressure across a wider surface area instead of biting into a narrow ring of hair. Allowing the perimeter roots to sit loosely can be kinder to delicate baby hairs along the hairline. If you ever experience scalp soreness or localized headaches while wearing a bun, take the accessory off, and see a doctor or dermatologist if it continues.
| Bun Variation | Suitable Curl Pattern | Accessory to Try | Good For |
|---|---|---|---|
| Pineapple High Bun | Type 3A to Type 4C | Wide fabric scrunchie | Home office hours and morning prep |
| Low Textured Chignon | Type 2C to Type 3C | Soft linen scrunchie with bow | A neat look for professional desks and formal meetings |
| Half-Up Topknot | Type 2A to Type 3B | Embroidered claw clip | Keeps front tendrils away from face while showing off length |
| Relaxed Messy Crown Bun | Type 3A to Type 4A | Embroidered button hair tie set | Quick daytime errands, weekend gardening, and casual gatherings |
| Twisted Nape Protective Bun | Type 3C to Type 4C | Linen oval barrette | Low-manipulation workdays |
| Side-Gathered Spiral Bun | Type 2B to Type 3B | Embroidered hair tie set | Adds soft romantic framing for weekend brunches and daytime events |
| Stacked Double Space Buns | Type 3A to Type 4C | Paired mini fabric scrunchies | Outdoor walks and active chores |
| Folded Loop Low Bun | Type 2C to Type 3C | Broad linen hair wrap or tie | Quick five-minute gathering for reading hours and household tasks |
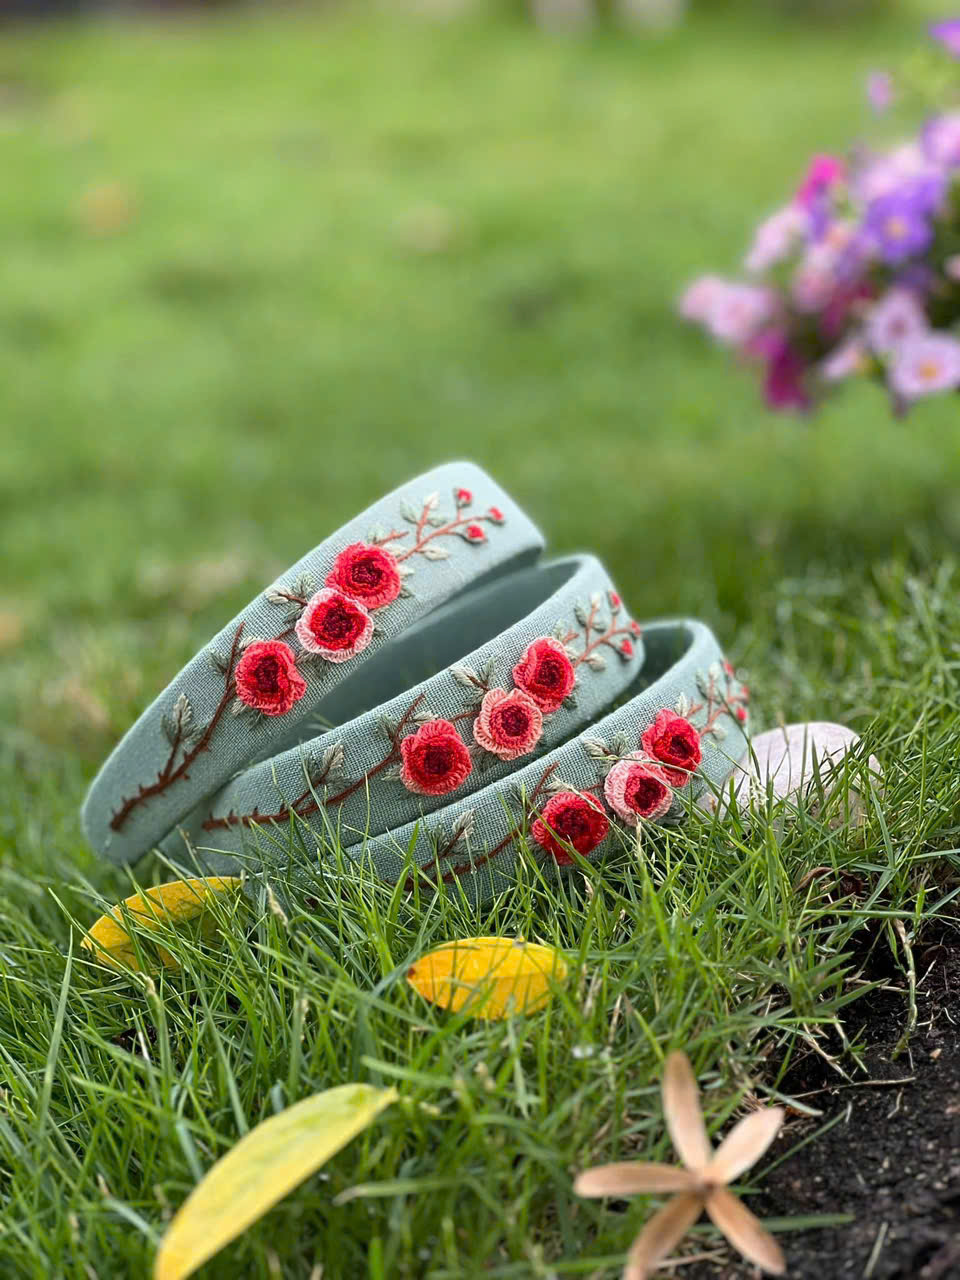
The Everyday Hair Set – Embroidered Headband, Scrunchie & Hair Ties
This small-batch set includes an embroidered headband (1.2 inches wide), a scrunchie, and button hair ties with botanical motifs. It is an easy way to try fabric accessories with your everyday bun.
How to Style an Everyday Curly Natural Bun: Step-by-Step Methods
To create an everyday curly natural bun, gently hydrate your strands with water, collect the curls using your fingers rather than a brush, and secure the base loosely with a wide fabric tie. Rolling or pinning the ends loosely can help keep curl shape and limit scalp pressure.
Styling textured hair into a daily updo requires an approach centered on texture preservation. When styling straight hair, people often rely on firm brushing and tight tension to achieve sleekness. With natural curls, however, beauty comes from dimensional clumps, natural spring, and soft perimeter framing. The following steps guide you through building a stable, relaxed bun that respects your natural curl pattern.
Step 1: Hydrate and Separate Curls Without Disrupting Clumps
Never begin styling dry curls if they have become tangled or frizzy overnight, as manipulating dry hair can snap delicate cuticles. Lightly mist your hair with clean water or a botanical leave-in spray until the strands feel faintly pliable. You do not need damp hair; a light mist is often enough to refresh your curl pattern.
Use your fingers as a wide-toothed comb to gently separate any matted areas, starting at the ends and moving slowly toward the roots. Avoid bristle brushes or fine-toothed combs entirely. Brushing separates cohesive curl clumps into an undefined cloud of frizz. If your crown curls feel dry, smooth a pea-sized amount of lightweight curl cream or natural botanical oil between your palms and gently glaze it over the surface.
Step 2: Determine Bun Placement Based on Curl Weight and Length
Where you position your bun affects both your silhouette and how weight is distributed across your scalp throughout the day. High crown buns, often worn as pineapple styles, celebrate Type 3 and Type 4 curl density. Placing the bun high lifts the weight off your neck and can keep the back of your hair from flattening against collars or chairs.
Low nape buns often work well for thicker, heavier textures and looser Type 2 waves. Anchoring the chignon near the base of the skull can reduce downward pull on your front hairline. Mid-height buns, resting near the occipital ridge, provide a classic, balanced aesthetic. Consider your daily routine: if you spend hours driving or resting against a high-backed office chair, a slightly higher or lower placement can avoid pressure against the headrest. Want two buns instead? Our guide to hair ties for space buns shares playful placement ideas.
Step 3: Gather Strands Using Open Palms and Finger Rakes
Once you select your placement, lean your head back slightly and gather your hair upward using open hands. Smooth the hair toward your chosen anchor point with the flats of your palms rather than digging your fingers deeply into the root layer. This technique preserves the natural undulating wave pattern along your scalp, giving your bun an effortless, soft look.
Allow natural volume to remain at the roots rather than slicking the perimeter down tightly. If you have shorter layers around your temples or the nape of your neck, do not force them into the gathered bundle. Leaving shorter tendrils loose helps avoid unnecessary pulling on fragile edges. These soft pieces can either frame your face naturally or be gently held in place later using a fabric headband.
Step 4: Secure the Base with Soft Fabric Ties
With your curls collected in one hand, slide a soft fabric fastener over the bundle. A wide linen scrunchie, soft cotton hair tie, or embroidered fabric band can provide support. Pass the fastener over the base once, then twist it for a second pass only if your hair density requires extra hold. Never force a third loop that chokes the curls or pulls the scalp taut. If you need a refresher on wrapping the base, see how to use a hair tie.
The goal is to provide a supportive cradle for the curls rather than a rigid clamp. Soft fabric can create gentle traction against textured strands, helping the bun stay in place without compressing the interior curls. If you have fine curls or lower density, an embroidered claw clip can be used on the gathered base instead of an elastic tie, so there is no band around the hair.
Step 5: Shape the Bun Body and Pin the Ends Loosely
Now that your base is anchored, shape the gathered lengths into your desired bun profile. For a relaxed chignon, divide the gathered ponytail into two loose sections. Wrap them gently around the base in opposite directions, allowing the curls to billow naturally rather than twisting them into a tight rope. Tuck the ends softly beneath the fabric tie. For a smoother, more polished shape, you can also look at our chignon bun hairstyle guide.
If you prefer an effortless messy bun, pull the ponytail only halfway through your fabric scrunchie on its final pass, creating an open loop of curls while leaving the ends exposed at the top. To anchor any loose sections that feel unstable, slide open-ended bobby pins or a linen-wrapped oval barrette horizontally into the base of the bun. Pinned horizontally against the gathered hair, the pins are less likely to poke your scalp. If you prefer a looser shape, read about choosing a hair tie for a messy bun.
Step 6: Release Soft Perimeter Tendrils for Natural Framing
The final step in crafting an everyday curly natural bun is softening the hairline. Look into the mirror and use your fingertips to gently coax a few baby curls free around your temples, in front of your ears, and along the nape of your neck. Loosening these perimeter strands releases residual tension and adds an organic, flattering finish to your style.
Avoid stiff hairsprays that can leave curls feeling dry and brittle. If you wish to tame any unruly flyaways along your part, smooth a drop of jojoba oil over the hair with your fingertips. A well-gathered bun should feel relaxed rather than tight; if it pulls at your scalp, loosen it.
Studio Experience: Everyday Bun Tips from Our Embroidery Table
Our studio works with natural linen every day, and we like fabric-covered accessories for everyday buns. Pairing them with low-manipulation gathering methods is a simple way to keep your curls with bun styles relaxed and tidy.
In our Ho Chi Minh City studio, we spend our days handling natural linen fibers, cotton threads, and hair accessories. Linen has natural slubs—subtle, organic irregularities in the spun yarn—which give it a textured, tactile surface. Many people like fabric-covered accessories for textured hair because they feel softer than slick synthetic bands or bare rubber elastics. Curious about fabric choices? Read our article on are cotton scrunchies good for hair.
The Double-Fold Linen Scrunchie Anchor: For women with dense Type 3 or Type 4 curls, trying to wind a conventional elastic three times can cause snapping and scalp soreness. In our studio, we like using a linen scrunchie. Gather your hair into a ponytail, pull the scrunchie over once, fold your curl bundle downward in half, and loop the scrunchie a second time over the fold. A soft scrunchie lets you hold the folded bundle without squeezing the curls into a tight, hard knot. You can see our linen bow scrunchie here for a soft, handmade way to secure a bun.
Root Management with an Embroidered Linen Headband: Second- and third-day curls often lose definition along the front hairline while the back retains beautiful volume. Instead of brushing your hair back with heavy gels, pair your everyday bun with an embroidered linen headband measuring about 1.2 inches (3 cm) wide. Place the stretchy band roughly half an inch behind your front hairline. It can help keep baby curls and flyaways in place, and it adds a delicate cottagecore floral touch to your everyday look.
Underside Support Using a Linen Rosette Barrette: Low buns often sag downward toward the neck after several hours of walking or desk work, creating uneven pulling at the crown. A studio trick we often share is sliding a linen-wrapped oval barrette (about 3.5 by 1.5 inches) horizontally beneath the base of the chignon. The barrette can catch the nape hair and the bottom fold of the bun, giving it a little extra support.
The Evening Pineapple-to-Morning Bun Transition: To make morning styling easier, transition your day bun into an evening pineapple before bed. Remove your daytime pins, gather your curls high on your crown using a loose linen scrunchie looped once, and sleep on a smooth pillowcase. In the morning, slide the scrunchie off, let your curls settle for five minutes, mist lightly with water, and re-gather into your daily chignon. Many people find this routine helps curl clumps last across multiple days with minimal restyling.
Trust and Hair Health: Common Mistakes That Flatten Curly Buns
Common bun mistakes include using exposed rubber elastics that snap textured strands, pulling hair taut while wet, and placing buns in the exact same spot every day. Adjusting these habits can be gentler on delicate hair and help keep natural curl bounce.
Textured curls are naturally delicate. Because each spiral contains numerous twists and bends, the cuticle scales along the outer curves are more vulnerable to mechanical friction than straight strands. Over time, small styling errors can accumulate into noticeable breakage, split ends, and thinning edges. Mindful daily styling means recognizing these common mistakes and adopting gentle, hair-friendly alternatives.
Mistake: Fastening Curls with Exposed Elastic Bands or Metal Clasps. Standard drugstore hair elastics with exposed rubber cores or glued metal joints can contribute to localized curl breakage. As you wrap a thin elastic around textured hair, individual strands can catch in the seams and wrap tightly around the rubber core, and may snap when you pull the tie off at the end of the day. The Fix: Replace raw elastics with seamless ties wrapped in soft fabrics like natural linen or soft cotton. Fabric-covered bands can spread tension over a wider surface area and tend to slide off curls more easily. To learn how elastics differ, see our overview of types of hair elastics.
Mistake: Dragging Hair into a Sleek Bun While Soaking Wet. Pulling freshly washed, soaking-wet curls into a tight bun might seem like a quick way to manage moisture, but hair is more fragile when it is saturated with water. Moisture temporarily breaks down internal hydrogen bonds, allowing strands to stretch significantly beyond their normal elasticity. Fastening wet hair tightly can cause strands to dry under continuous tension, which may lead to cuticle fraying and loss of natural curl spring. The Fix: Allow your curls to air dry until they are mostly dry before gathering them, or keep wet buns very loose using a broad, soft scrunchie.
Mistake: Anchoring the Bun in the Exact Same Scalp Position Daily. Securing your bun at the exact same location on your crown day after day concentrates repetitive friction on identical hair follicles. Over weeks and months, this focused stress can cause thinning around the vertex or along the hairline. Hair pulled back tightly over and over can cause traction alopecia. If you notice soreness or thinning, take the accessory off, and see a doctor or dermatologist if it continues. The Fix: Vary your bun placement throughout the week. Wear a high crown bun on Monday, a low nape chignon on Tuesday, and a half-up bun secured with a claw clip on Wednesday to let your scalp rest.
Curly Natural Bun FAQ
How do I make my curly natural bun look voluminous if my hair is fine?
To add volume to fine curls without backcombing, create an internal base rather than tightening the exterior band. Gather your curls into a loose ponytail using a soft linen scrunchie, then separate the tail into two halves. Gently wrap each half around the base in opposite directions, pinning the ends loosely with open bobby pins. This creates an airy, layered shape that highlights natural curl loops without compressing the interior space.
Can I wear a natural curly hair bun every day without damaging my hair?
Many people wear a bun most days, and gentle habits can help. Avoid thin rubber bands and choose wide fabric ties or linen scrunchies that spread pressure over more of the hair. Keep the perimeter roots loose rather than slicked flat, and shift the bun position between your crown, mid-head, and nape throughout the week. If a bun ever feels tight or sore, take it out, and see a doctor or dermatologist if soreness continues.
What is an effective way to do a natural curly hair bun without brushing out my curls?
Never use a paddle brush or fine-toothed comb on dry curls, as bristles pull curl clumps apart into static frizz. Instead, mist dry hair lightly with water or a curl spray, then use your spread fingers as a wide rake. Smooth the outer surface gently toward your gathering point with open palms, keeping the spiral texture untouched, and secure the bundle loosely with a soft fabric tie.
How do I refresh an everyday curls with bun style on second or third-day hair?
Take down yesterday’s bun and gently massage your roots with your fingertips to restore natural lift. Lightly mist the mid-lengths with water to reactivate curl memory, scrunching softly with your hands. Re-gather the hair into a relaxed low chignon. If front flyaways feel unruly, slide on an embroidered linen headband to frame your face.
How should I care for hand-embroidered hair accessories used with curly buns?
To care for hand-embroidered linen accessories, spot clean them. If hair oils or leave-in conditioners transfer onto your headband or scrunchie, dab the fabric lightly with a damp cloth. Avoid machine washing or submerging embroidered pieces, which can distort delicate hand stitches. Let the accessory air dry naturally.
Embracing Your Everyday Curls with Mindful Care
A thoughtfully styled curly natural bun can show off your unique texture with very little fuss. At BabunobGem, we hand-embroider botanical hair accessories in small batches in our Ho Chi Minh City studio, mostly on natural linen. Most items are under $25. Orders are usually prepared in 1–3 business days. US delivery is estimated 10–14 business days, with tracking. Celebrate your everyday curls with a few soft, embroidered touches.
New here? Get 10% off your first order
Join our list for new small-batch designs and restocks, or browse the collection now.
Note: Each piece is embroidered by hand, so stitches and colors can vary slightly from the photos. Fit and feel depend on head size, hair type and how you wear it. This guide is for general information only.