
How to Make a Chignon Bun Hairstyle
Bun chignon hairstyle ideas turn a simple low updo into a polished shape, whether your hair is fine and straight or thick and wavy. This step-by-step tutorial from BabunobGem shows women how to build a low chignon at the nape, pin it with care and keep tension on the scalp low.
Key highlights
- How a classic low chignon differs from a top knot and a ballet bun.
- Steps for prepping different hair textures so pins have something to grip.
- The crossed bobby pin technique for holding long, heavy hair with less pull on your roots.
- Ways to pair a chignon with hand-embroidered linen accessories for a cottagecore look.
- Common tension mistakes and how to keep pull on your hairline low.
Anatomy of the Chignon: Types, Textures, and Hair Mechanics
A classic chignon is a low-set updo anchored at the nape of the neck, usually with tucked ends and balanced volume that sits against the curve of the skull.
The term comes from the French phrase chignon du cou, which refers to the nape of the neck. People often use “hair bun” for every updo, but a chignon is specifically a low bun at the nape. Unlike top knots that sit on the crown or round ballet coils wound tightly in the center of the head, a chignon follows the natural slope of the skull. Sitting low like this keeps the weight of your hair near the base of your neck, which can reduce the downward drag some people feel on the scalp by midday.
When studying how to make a hair bun that remains comfortable for hours, balance matters more than tightness. A chignon relies on interlocking shapes—such as smooth rolls, loops, or folded twists—rather than aggressive elastic tension. This makes the style adaptable for fine, silky hair that tends to slide out of clips, as well as thick, coarse hair that easily overwhelms standard ties. Thick or coiled hair can be tough on small elastics, so see our hair ties for curls.
Structural Differences Among Classic Bun Silhouettes
To choose the right method for your daily routine, it helps to understand how a low chignon compares to other common updos. The structure you choose affects how long the style lasts and how comfortable it feels during desk work, errands or an evening out. A relaxed twist on the classic look can borrow from 90s hairstyles with scrunchies for a playful feel.
High top knots draw the eye upward, but they can pull on the front hairline when gathered tightly. Ballet buns usually need precise slicking and a hairnet to keep every strand in place. A low chignon relies on gravity and the hollow at the base of the skull, where the weight of your hair can settle instead of tugging at the temples. Playing with height? Try our guide to hair ties for space buns for a more playful take.
Texture, Friction, and Hair Density
Hair texture influences how strands interlock. Freshly washed hair often lacks surface friction, so pins can glide out. Day-two hair, or strands prepped with a touch of dry texturizing paste, gives pins more to grip. Fine hair can benefit from gentle back-combing near the base for a little internal support. Thick hair often works better divided into two twists, which avoids an overly bulky knot that pulls away from the neck. If you wonder about fabric, our article asks it plainly: are cotton scrunchies good for hair, and when?
Wavy and curly hair often holds a chignon well because the natural bends in the strands catch on each other. When styling textured hair, the goal shifts from adding volume to keeping the coils from being squashed, so the updo stays soft rather than stiff. Curly and coily hair can take this shape too, as our curly natural bun ideas show.
| Updo Style | Nape Placement | Hair Texture & Length | Fastening & Anchor Method |
|---|---|---|---|
| Classic Tucked Chignon | Occipital hollow at nape | Medium to long; straight or wavy | U-shaped hairpins & seamless elastic |
| Gibson Tuck Chignon | Level with lower earlobes | Shoulder-length to medium; fine or medium | Inverted hair pocket & bobby pins |
| Twisted Rope Chignon | Base of the neck | Long; medium to thick density | Interlocked bobby pins & small clear band |
| Braided French Chignon | Low neckline, wrapped under | Medium to long; fine, wavy, or layered | Perimeter pins through plait folds |
| Deconstructed Low Bun | Just above collarbone line | Medium to long; textured, wavy, or curly | Open u-pins & gentle crown pinch |
| Ballet Low Bun | Centered hairline, wound tight | Shoulder to long; fine or straight | Hairnet barrier & curved steel pins |
| Knot Chignon | Direct center nape | Long; medium to coarse texture | Self-locking loop & dual anchor pins |
| Rolled Side Chignon | Tilted behind one earlobe | Medium to long; fine or straight | Barrette base & diagonal grip pins |
| Half-Up Low Bun | Mid-occipital zone | Bob to long; many textures | Linen clip anchor & mini elastic |
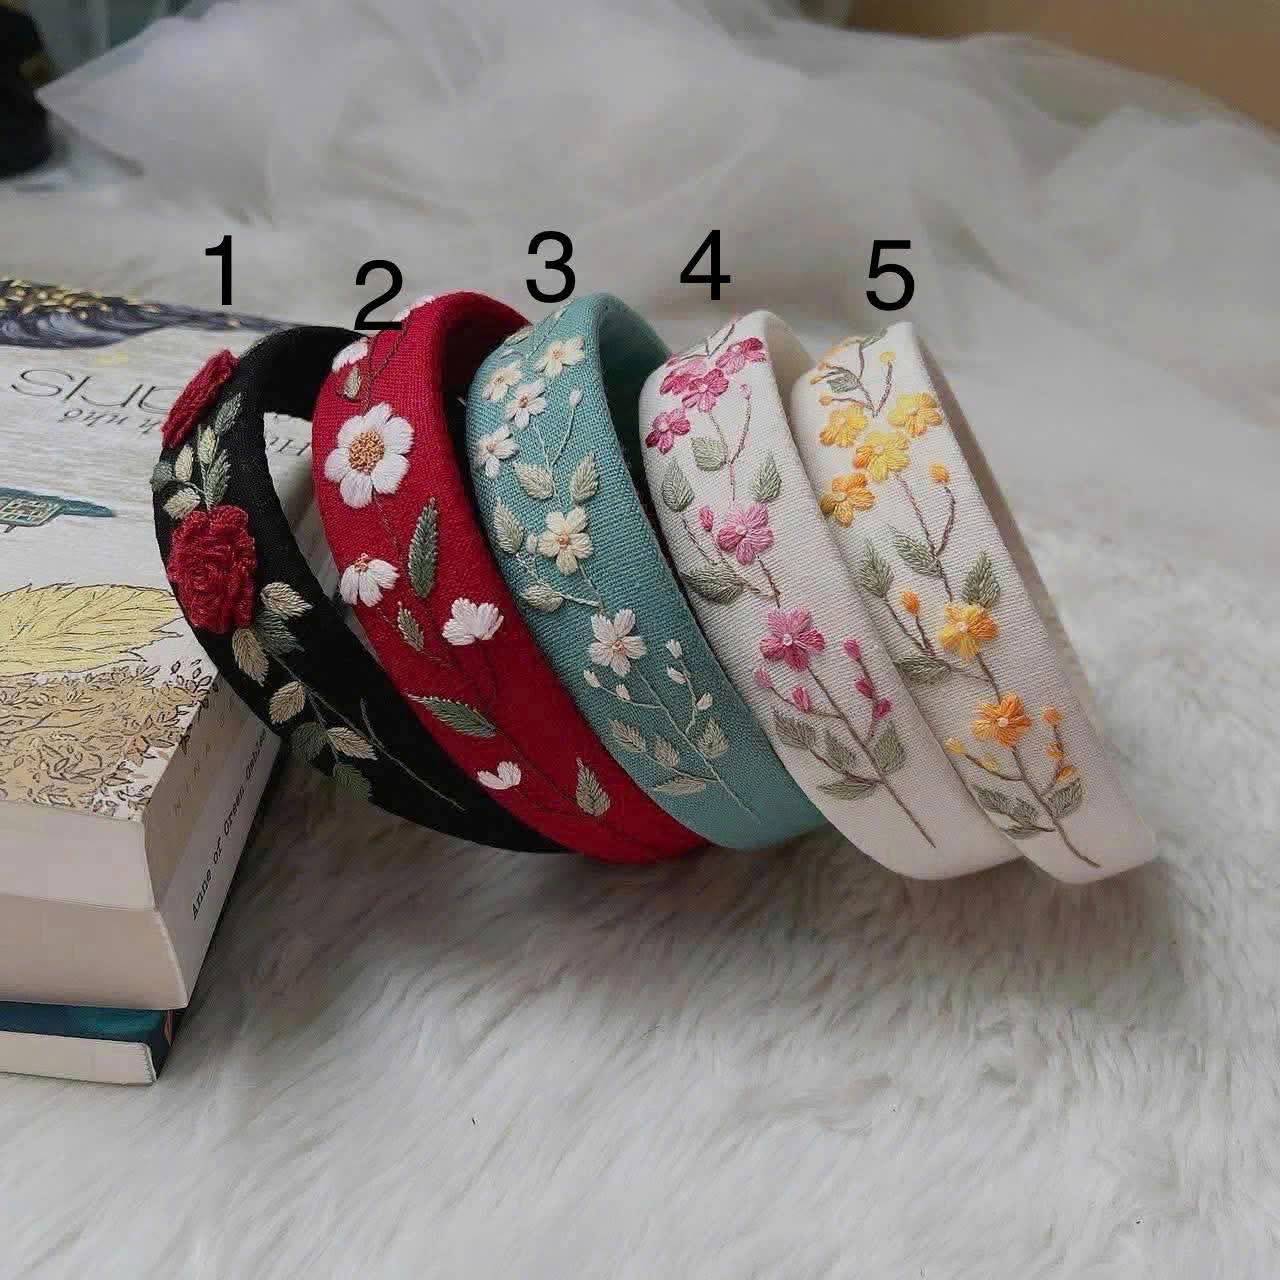
Wildflowers Embroidered Headband
If plastic clips and pins slip out of your low updos, a headband may be worth trying with a chignon. This one is hand-embroidered with wildflowers on natural linen and sits on a soft, stretchy band.
How to Make a Chignon Bun Hairstyle: Step-by-Step Guide
To make a chignon bun hairstyle, secure your hair into a low ponytail, roll or twist the length upward into the nape hollow, and anchor the perimeter using crossed bobby pins.
Understanding how to put my hair in a bun with a polished finish comes down to doing the steps in order. When putting hair in a bun without a clear technique, strands can bunch unevenly, leaving ends sticking out or creating pressure spots. The method below balances hold and comfort and lets you adjust the shape to your taste.
Step 1: Preparing Strands and Distributing Texture
Begin by brushing thoroughly to remove tangles from mid-lengths to ends. If your strands are silky or freshly washed, mist lightly with a dry texture spray to give pins something to grip. When learning how to tie a bun in hair, building in grip during preparation can keep the whole structure from unraveling later.
Part your hair according to your preference. A clean middle part offers a modern, editorial symmetry, while a soft side part flatters romantic cottagecore looks. Leave out small tendrils around the ears and temples if you prefer an effortless, face-framing softness rather than a slicked exterior.
Step 2: Establishing the Low Foundation Ponytail
Gather your hair at the nape of your neck, resting the base right against the natural dip where your skull meets your neck muscles. Secure the base using a small, smooth elastic. When learning how to put a bun in hair without tension, pull the elastic just snug enough to hold the gathered weight, avoiding over-tight loops that pull the hairline.
Gently slide your fingertips beneath the crown hair and lift upward by a few millimeters. This small adjustment can ease scalp tension and adds a little volume at the back of the head, so the profile looks rounded rather than flat.
Step 3: Forming the Core Roll and Anchor Loop
Now, separate the ponytail into two equal vertical strands. Twist each strand gently inward toward the center, then wrap them together into a loose rope. Alternatively, for a smoother finish, lift the entire ponytail upward, loop it downward over your index finger, and tuck the tail underneath the elastic base.
This tucking motion forms the primary body of the chignon. As you discover how to create a hair bun, keep the bulk centered along the nape hollow. Avoid letting the coil sit too high, where it competes with the crown, or hanging past the collar, where it can rub against coat collars and loosen.
Step 4: Wrapping and Pinning Long Strands
If you are exploring how to put long hair in a bun or how to tie a bun long hair, you will likely have excess length remaining after the initial loop. Take the remaining tail, wrap it smoothly around the perimeter of the gathered base, and tuck the ends neatly underneath the bottom curve.
Secure the shape using standard steel bobby pins and open u-shaped hairpins. Insert each pin with the wavy side facing down against the scalp. Catch a tiny sliver of hair from the outer edge of the roll, push the pin outward slightly to gather resistance, and then slide it firmly inward toward the core elastic. Cross two pins in an “X” at the base to hold the heavy sections in place.
Step 5: Softening Crown Silhouette and Balancing Proportions
Once the base is pinned, examine your profile in a handheld mirror. The chignon should appear balanced from both sides without pulling your neck posture backward. Use your fingertips to gently pull at individual ridges along the bun to widen the roll if you desire a fuller, softer look.
Finish by smoothing flyaways lightly with your palms. If you have kept temple strands free, roll them gently between your fingers or tuck them softly behind your earlobes so they blend naturally into the lower roll.
Alternative Method: The Quick Loop Chignon for Busy Mornings
When time is limited, learning how to hair in a bun comes down to a simplified one-elastic motion. Gather your hair low, begin pulling it through the elastic, but on the final wrap, stop halfway to form a simple folded loop. Take the loose ends dangling beneath, wrap them upward around the exposed band, and fasten with two crossed bobby pins. This gives a relaxed chignon shape that works for casual workdays. For a looser take, our tips on a hair tie for a messy bun show a relaxed version.
Studio Styling Notes: Hair Type Adjustments and Accessory Pairings
Adjusting your chignon to your hair density and pairing it with handcrafted botanical accessories can turn a simple, practical updo into something more personal.
In our Ho Chi Minh City studio, where we hand-embroider floral motifs onto natural linen, we often talk about how hair accessories work alongside classic updos. An accessory should not fight your hairstyle for control of the shape; it should sit against the finished style and add a little warmth and visual interest.
Angle your pins sideways. When securing a low chignon, try not to push bobby pins straight upward into the ponytail elastic. Instead, slide each pin in horizontally from the side, catching a small amount of hair from the roll, and finish with the pin lying flat along the scalp. Pins set at this angle can give the roll a firmer grip than pins pushed straight up.
Pair the bun with an embroidered headband. A headband and a low chignon sit in different places, the band at the crown and the bun at the nape. Our hand-embroidered linen headbands are 1.2 in (3 cm) wide and sit on a soft, stretchy band. Slide one on after you finish the bun, about an inch behind your front hairline, to help keep baby hairs back while the embroidery frames your face.
Adapt the bun for layered or fine hair. Shorter front layers often escape low twists. Rather than fighting them with heavy gel, twist those side sections loosely backward and weave them into the top fold of your chignon before inserting pins. For very fine hair, swapping flat bobby pins for textured, matte-coated U-pins can help keep the hardware from sliding out of the roll as you move.
Dress it up for the evening. A low bun styled in the morning can be dressed up for dinner or a celebration. Slide a hand-embroidered oval barrette, wrapped in linen with an embroidered rosette, just above the top curve of your bun. It adds a handmade accent to a polished updo. For a bit of detail at the base, you can see our linen bow scrunchie here.
Common Chignon Mistakes and How to Avoid Them
Common chignon mistakes include pulling the base elastic too tightly, forcing pins directly against the scalp, and styling wet strands, all of which can make the style less comfortable and harder on your hair.
A hairstyle should support your daily comfort, never cause lingering tension. Because the chignon rests at the lower hairline, many people instinctively over-tighten their hair ties, fearing the roll will fall. Knowing where tension comes from makes it easier to adjust. If a style gives you a headache, take it out, and talk to a doctor if headaches continue.
Mistake: Over-tightening the foundation elastic at the nape. Winding an elastic three or four times until it pulls the hairline taut puts constant pull on the hair around your ears and neck. The American Academy of Dermatology notes that hair pulled back tightly over and over can cause traction alopecia, a type of hair loss. To avoid this, wrap the band just twice so the hair is gathered loosely, let crossed hairpins hold the bun in place instead of a tight elastic, and see a dermatologist if you notice thinning. A soft finishing touch can help, and you can see our hand-embroidered silk scrunchie here.
Mistake: Forcing bobby pins open before inserting them. Prying bobby pins wide open with your fingers before inserting them weakens their internal spring tension. Pushing them flat against the scalp can also scrape the skin and pull on individual roots. Slide pins into the hair without forcing them open; let the rounded tips part the strands naturally. The wavy ridge of the pin belongs against the scalp, where it catches natural contours for grip.
Mistake: Coiling completely damp or wet hair into a dense chignon. Wet hair stretches more than dry hair and is more vulnerable to breakage. Twisting wet hair into a tight roll traps moisture against the scalp and puts extra tension on strands as they dry and shrink. Let your hair dry completely, or at least until it is only slightly damp, before winding it into a chignon.
Bun Chignon Hairstyle FAQ
What is the difference between a chignon and a regular hair bun?
While all chignons are technically hair buns, not all hair buns are chignons. A standard hair bun can sit at the crown, mid-head, or side, and often consists of hair wrapped around itself in a circular coil. A chignon specifically rests at the nape of the neck (from the French chignon du cou) and usually features tucked, folded, or looped ends fastened into the hollow at the base of the skull for a tailored, low-profile shape.
How can I help my chignon stay in place without harsh hairspray?
A lasting hold usually comes from friction rather than stiff products. Prepping your strands with a small amount of dry texture paste or styling on day-two hair gives pins traction. Use the cross-pinning technique: insert two bobby pins horizontally from opposite directions so they overlap like an “X” through the core elastic. The interlocking pins can give a firmer grip that moves with your head.
Can I style a chignon bun hairstyle if I have shoulder-length or layered hair?
Yes, a chignon can work with shoulder-length or layered hair, as long as you can gather it at the nape. If shorter face-framing layers slip free, gently twist them along the hairline and pin them directly above the bun roll. You can also use a linen-wrapped snap clip or tuck the ends into a low French roll variation to keep shorter sections tidy.
How can I reduce scalp soreness when putting hair in a bun?
Scalp tenderness often comes from the hair being pulled too tightly, especially when an elastic is wrapped tightly in a single direction. After securing your low ponytail, use your fingertips to gently ease out small sections along the crown and above the ears to redistribute tension. Position the weight of the bun directly in the natural curve of your nape so it rests against the neck rather than pulling downward on the scalp. If your scalp stays sore after you take the style out, see a doctor.
Which hair accessories pair well with a low chignon?
Botanical, hand-embroidered accessories pair well with a low chignon. A hand-embroidered linen headband worn along the hairline can keep front strands back while framing the face. For an accent at the back, an oval barrette wrapped in linen with an embroidered rosette, placed just above the nape roll, adds a handmade detail.
Embracing Slow Craft and Everyday Elegance
A chignon bun hairstyle is a simple way to bring a polished, low updo into your daily routine. At BabunobGem, we believe everyday hair rituals deserve some care. Each of our botanical hairpieces is embroidered by hand in small batches in our Ho Chi Minh City studio, mainly on natural linen. Orders are usually prepared in 1 to 3 business days and take an estimated 10 to 14 business days to reach the US, with tracking.
New here? Get 10% off your first order
Join our list for new small-batch designs and restocks, or browse the collection now.
Note: Each piece is embroidered by hand, so stitches and colors can vary slightly from the photos. Fit and feel depend on head size, hair type and how you wear it. This guide is for general information only.