
Hair Tie for Messy Bun: Quick Tutorials
A hair tie for a messy bun should be wide enough to spread the weight of your hair and loose enough to keep the style relaxed. This guide from BabunobGem offers quick loop, twist and tuck tutorials for busy women, plus tips on matching a tie to your hair and keeping face-framing strands soft.
Key highlights
- How different hair tie materials spread weight and affect friction on your hair.
- Step-by-step tutorials for classic loop buns, twist wraps, and low face-framing updos.
- Studio tips for securing fine or silky hair without resorting to aggressive tightness.
- Simple habits for keeping tension low, and what to do if your scalp feels sore.
The Anatomy of a Messy Bun: Hair Ties, Tension, and Hair Health
A good messy bun relies on a loose hold and evenly spread tension rather than pulling your hair tie as tightly as possible. A wider tie can help you get a full, undone shape with less strain on your hair.
The messy bun is a staple updo because it balances casual ease with practical function. Many people struggle because the bun either slips out after a while or feels uncomfortably tight. The fix is rarely more force on the elastic. It comes down to how your hair tie works with your hair texture, strand density and the natural weight of your ponytail. Choosing the right hair tie for a messy bun helps the style stay loose, comfortable and easy to wear.
When you gather your strands into an updo, you create a point of tension along the base. Standard rubber elastics can pinch that point into a narrow, concentrated band. Wider fabric-wrapped bands, scrunchies and corded ties can spread the weight over a larger area, which can help you get an airy, full shape with less strain on your roots.
How Hair Tie Materials Influence Hold and Cuticle Stress
Different hair ties put friction on your hair in different ways. Thin synthetic elastics press hard over a tiny cross-section, and sliding a rough band over dry strands can scrape the cuticle, which can lead to fraying and split ends. Synthetic bands can also snag individual strands when removed carelessly. To see how different bands compare, you can read about the types of hair elastics.
Fabric-wrapped ties are often described as gentler than a bare elastic, because the fabric gives a wider, softer surface. A textured fabric such as linen adds some grip, while smooth fabrics such as silk and satin tend to slip more, so they may need an extra anchor on fine, straight hair. You can see our handmade hair ties here if you would like a fabric-wrapped option for your bun.
Matching Tie Elasticity to Hair Texture and Density
Hair density affects how much grip you need. Fine strands have a narrow diameter, so they can slip through a loose tie. For fine hair, a tie with some surface texture can add grip, which may mean fewer wraps around the base.
Coarse, curly or thick hair usually does better with a tie that stretches generously and has a wide circumference. Forcing thick hair through an undersized elastic can overstretch it and pull on the hair around your temples. For denser hair, a medium-to-large scrunchie or a wide fabric tie gives your hair more room, so the bun can sit in a relaxed, romantic drape across your crown.
| Hair Tie Type | Material | Good For | Things to Watch For |
|---|---|---|---|
| Standard Metal-Free Elastic | Thin synthetic elastic | High utility knots, athletic buns | Concentrated tension; can cause breakage if pulled tightly |
| Spiral Plastic Cord Tie | Coiled plastic cord | Casual topknots and quick updos | May leave fewer deep ring marks than a thin elastic, but the hold can be uneven |
| Natural Linen Scrunchie | Natural linen | Low romantic buns, relaxed loops | Keep the wrap loose to avoid tugging |
| Embroidered Button Hair Tie | Embroidered button tie, sold as a set | Half-up messy buns, side twists | Adds a handmade detail; keep the wrap loose |
| Silk Scrunchie | Silk | Low buns and topknots | Any tie can pull if wrapped tightly |
| Thick Ribbed Cotton Band | Ribbed cotton | Medium-height loop buns | Wider bands can slide on very fine or slick hair |
| Seamless Nylon Ribbon Elastic | Flat nylon ribbon elastic | Quick fold-over buns, fine-hair loops | The flat shape may crease hair less than a thin round elastic |
| Linen Bow Scrunchie | Linen with a bow | Low messy bun with face framing strands | The bow adds a decorative detail; keep the wrap loose |
The Physics of the Undone Updo: Loft, Anchor, and Balance
A pleasing messy bun relies on three factors: an anchor point, structural loft and balanced perimeter slack. The anchor point is where your hair tie wraps around the base of the hair bundle. If it sits too high on the crown without support, gravity can pull the mass downward, causing sagging and some scalp tenderness by afternoon. Anchoring near the occipital bone or just above the crown gives the bun a steadier base.
Structural loft refers to the air pockets you create when you loop or fold your hair instead of winding it into a tight coil. Trapped air makes hair look fuller while using less tension. Perimeter slack means easing strands loose around the ears, temples and nape, which softens a severe, pulled-back look and frames your features with natural movement.
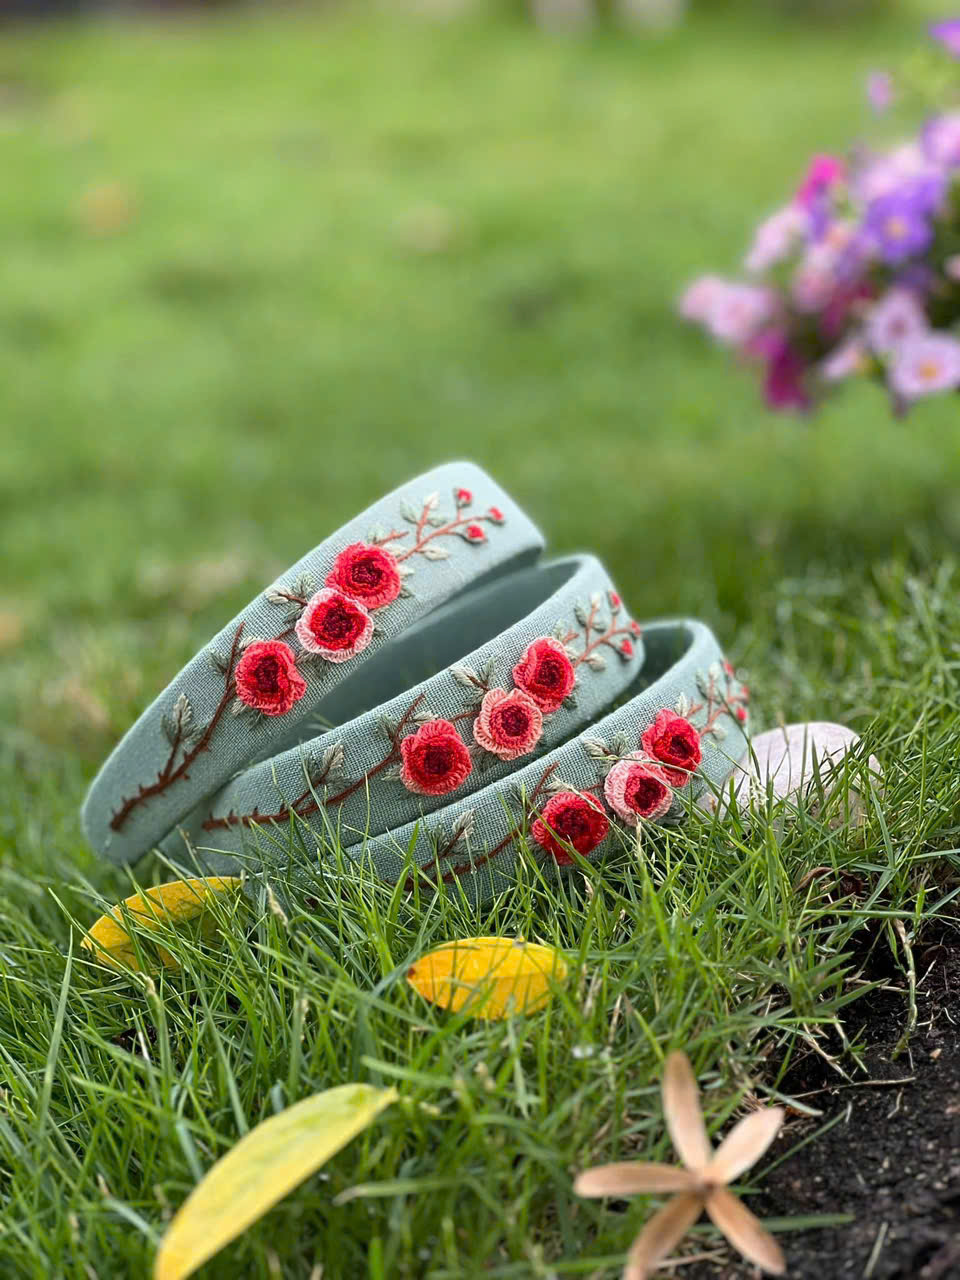
The Everyday Hair Set – Embroidered Headband, Scrunchie & Hair Ties
If thin elastics tend to pull at your roots during a long day, a set of fabric pieces may be worth a look. The Everyday Hair Set includes an embroidered headband, a scrunchie and hair ties.
Quick Tutorials: How to Do a Messy Bun with a Hair Tie Step by Step
To create an effortless messy bun, gather your hair into a ponytail, pull it halfway through your hair tie on the final pass to form a loop, wrap any remaining ends around the base, and gently tease the crown for balanced volume. Adjusting the placement and your face-framing strands adapts the look to different hair lengths.
A stylish messy bun does not need salon tools or dozens of hidden pins. With the right technique and a hair tie that suits your hair, you can put together a balanced updo in a couple of minutes. The tutorials below cover different hair lengths, textures and routines, from a quick morning loop to a romantic low updo.
Step 1: Prep Hair Texture and Build Base Friction
Slick, freshly washed hair can slip out of an updo because it has little friction. To give your hair tie something to grip, build some texture first. If your strands feel slippery, mist your mid-lengths with a light sea salt spray or dust a little dry texture powder at the crown, and work it in with your fingertips rather than a brush.
For naturally wavy, curly or second-day hair, your built-in texture is already a good base. Skip vigorous brushing, which smooths out the waves that give a messy bun its lived-in character, and detangle with a wide-tooth comb or your fingers instead. Textured and curly hair has its own approach, which our curly natural bun ideas cover in more detail.
Step 2: The Fast Loop Hair Tie for Messy Bun Method
The loop method is a quick everyday updo technique that takes only a few seconds once you have the hang of it. Gather all your hair at your chosen height, either high at the crown or midway down the back of your head. Hold the gathering in your dominant hand, slip your hair tie over the base, and twist the tie once to form a figure-eight, just as you would for a regular ponytail. If you prefer a looser tail, a messy ponytail uses the same relaxed loop and can be quick to do.
On the second or third pass of the hair tie, do not pull your hair all the way through. Pull the bundle only halfway through the band to make a loop on top, leaving the ends resting underneath against your nape. Use your thumbs to tug outward on the sides of the loop and fan it into a wider crescent. The folded hair adds volume without complicated pinning. If wrapping feels tricky, our tips on how to use a hair tie break it down simply.
Step 3: Low Messy Bun with Face Framing Strands
A low messy bun with face framing strands gives a relaxed look that suits casual outings, workdays and cottagecore styling. Begin by using your thumbs to separate two soft tendrils along your hairline, one in front of each ear, plus any shorter fringe pieces. Leave these strands loose before you touch the rest of your hair so they do not get caught in the tie. When you want a neater finish, our chignon bun hairstyle guide shows a polished low option.
Next, gather the remaining hair loosely at the nape of your neck, against the base of your skull. Slip on a linen scrunchie or another fabric tie and secure the ponytail with two loose wraps. On the final wrap, pull the strands into a loose loop. Divide the tail ends hanging below the tie into two sections, cross them beneath the bun, and tuck them upward into the outer edge of the scrunchie. A low position usually pulls less on the crown, and the loose strands soften the line of your jaw.
Step 4: The Twist and Tuck Wrap for Longer Hair
Long or dense hair can make a simple loop bun feel heavy, and the tie may sag downward. The twist-and-tuck technique spreads longer strands around the base for better balance. Begin by pulling your hair into a mid-height ponytail and securing it loosely with a fabric hair tie. Do not wrap the band as tightly as you can; leave enough slack to slide a finger beneath it.
Gently twist the length of your ponytail into a loose rope. Coil the rope around the base of the hair tie in a circle, keeping the coil wide and relaxed rather than wound tight like a ballerina bun. Once you reach the ends, tuck them beneath the outer loop of your hair tie or slip a second small fabric tie over the whole knot. This spreads the weight of longer strands across a broader base, which can reduce pulling at the roots.
Step 5: The Half-Up Mini Messy Bun
If you have shoulder-length hair or want to keep front strands out of your face while showing off your length, a half-up messy bun works well. Part your hair horizontally from the tops of your ears up toward the crown. Gather this upper section with your fingers, leaving the lower layers hanging down your back. Lifting only the crown section can give fine hair a fuller look. For a playful twist on small buns, see our guide to hair ties for space buns.
Secure this gathered crown section with a small embroidered button hair tie or a compact fabric elastic. Pull the strands through into a petite half-loop on the final pass. Because this mini bun holds less hair, it tends to feel lighter. You can leave the ends sticking out around the base for an undone look, or tuck them under the tie for a rounded shape.
Step 6: Softening the Silhouette and Balancing the Crown
The difference between an intentional messy bun and an accidental tangle comes down to the finishing touches. Once your bun is anchored, check the silhouette in a mirror. Look at the balance between the bun and the hair resting against your scalp. If the top of your head looks pulled back too tightly, place your fingers flat against your crown and gently slide them forward by half an inch.
This motion eases small sections of hair upward and adds soft crown height. Next, lightly tug at the outer edges of the bun loop to expand its shape. If your face-framing pieces look too straight, twirl them around your index finger with a touch of lightweight leave-in balm to encourage a soft wave.
Studio Secrets: Styling and Care Tips from Our Embroidery Studio
In our studio, we work with your hair’s natural movement, layer two accessories instead of tightening a single band, and spot clean embroidered ties with a damp cloth.
In our studio in Ho Chi Minh City, we spend our days working with natural linen, embroidery floss and hair accessories of all shapes. Here are four practical tips we often share with women who love a relaxed updo.
The Double-Tie Anchor Method for Silky Strands Fine, straight hair often slips through a single loose tie. Rather than pulling one band uncomfortably tight, use two coordinating accessories. Secure a base loop using a thin, metal-free band wrapped moderately. Then, slide a natural linen scrunchie or an embroidered button hair tie directly over the top. The first band does the holding, and the outer fabric piece hides the base and adds a handmade finish. A fabric piece over the base adds charm, and you can see our hand-embroidered silk scrunchie here.
Pairing Relaxed Updos with Embroidered Linen Headbands A low messy bun with face framing strands pairs well with a botanical headband. Slip a 1.2 in (3 cm) embroidered linen headband onto your head before gathering your bun. Position the soft band just behind your hairline, pull out your front wisps, and then secure your low bun. The headband can help keep shorter flyaways off your face while adding hand-stitched floral detail to a casual hairstyle.
Midday Volume Restoration Without Undoing the Base If your bun begins to droop after several hours of movement, do not take the whole updo apart. Removing and re-tying can tangle hair and put extra strain on your roots. Instead, insert two fingers into the center of the bun loop and gently tug outward. Then, slide your thumbs beneath the base hair tie and press upward toward the crown. This simple repositioning can lift the shape again in seconds.
Caring for Hand-Embroidered Hair Ties and Scrunchies Hand-embroidered accessories need gentle care. If your embroidered hair tie or linen scrunchie gets dusty or picks up hair oils, do not put it in a washing machine. Wipe the fabric lightly with a clean, damp cloth, avoiding hard rubbing across the raised embroidery stitches, then lay the accessory flat on a towel to air dry completely away from direct heat.
Common Updo Mistakes and How to Reduce Hair Damage
Common bun mistakes include securing bands too tightly around the hairline, styling hair while sopping wet, and using rough metal-clasped elastics. To lower the risk of damage, keep elastic tension low, let hair dry before styling, and choose smooth, fabric-wrapped ties without rough metal joins.
A messy bun should be a relaxed style, not a source of strand breakage. Because it feels so casual, many people overlook the stress that poor technique can put on their hair. Knowing the usual mistakes makes it easier to keep your bun loose.
Mistake: Pulling Hair Ties Too Tightly at the Roots Wrapping an elastic band several times until it pulls your temples taut can strain your hair. The American Academy of Dermatology notes that hair pulled back tightly over and over can cause traction alopecia, a type of hair loss. If your scalp feels sore or tight, take the tie out and start again with a looser hold, choose a wider fabric scrunchie, and let your perimeter strands stay loose. If soreness continues after you take the updo down, see a doctor or dermatologist.
Mistake: Styling Sopping Wet Hair into a Tight Bun Wet hair is more fragile than dry hair and stretches more before it snaps. When you bind wet hair tightly with an elastic, the strands are stretched, and as they dry inside the compressed knot they can tighten and snap along the mid-lengths. Let your hair air dry or rough-dry until it is only slightly damp, or fully dry, before securing it with a hair tie.
Mistake: Relying on Metal-Clasped Elastics and Snagging Bands Hair ties with crimped metal joins can snag hair. When you twist and untwist a metal-clasped tie, fine hairs can get trapped under the metal edge and snap off near the crown, which leaves short, bristly flyaways. Look for seamless bands, fabric scrunchies or corded ties with smooth, fabric-covered joins instead.
Hair Tie for Messy Bun FAQ
What type of hair tie for messy bun updos helps reduce strand creasing?
A wide, fabric-covered scrunchie can reduce creasing because it spreads pressure over a larger area. Narrow synthetic bands press hair into a tight crease line, while a wider band makes a softer bend, so your hair may keep more of its natural wave when you take it down later in the day.
How do you do a low messy bun with face framing strands on shorter or layered hair?
For shorter or layered hair, begin by clipping away face-framing pieces around your ears. Gather the remaining back hair into a low ponytail near your nape using a small fabric tie. Pull the ponytail halfway into a mini loop on the last wrap. Secure any short underside layers that slip out with small linen snap clips rather than tightening the main band.
Why does my messy bun keep falling down after an hour?
A messy bun often slips because the hair is very slick or the hair tie has stretched out and lost its grip. Smooth hair has little surface friction for the band to grip. Apply a small amount of texture powder or sea salt spray to your roots before styling, and swap in a fresh tie if yours feels loose.
Can wearing a hair tie for messy bun styling daily cause hair loss?
It can if the tie is tight. Hair pulled back tightly over and over can cause traction alopecia, a type of hair loss. To lower the risk, keep your bun loose, vary its placement between high and low positions, and take it down if your scalp feels sore. If you notice thinning, see a dermatologist.
How should I clean and maintain hand-embroidered hair ties?
Spot clean hand-embroidered hair ties and linen scrunchies by hand. Wipe the fabric lightly with a clean, damp cloth, and avoid soaking the piece, putting it in a washing machine or rubbing the embroidery hard. Let the accessory air dry completely on a flat towel, away from direct heat.
Everyday Ease and Thoughtful Craftsmanship
A messy bun should feel simple and relaxed, and the right hair tie can help. At BabunobGem, we make hair accessories slowly by hand, embroidering botanical designs mostly on natural linen in small batches in our Ho Chi Minh City studio. Whether you wear a low messy bun or a high loop, we hope these tutorials give you an easy starting point for your everyday hairstyle.
New here? Get 10% off your first order
Join our list for new small-batch designs and restocks, or browse the collection now.
Note: Each piece is embroidered by hand, so stitches and colors can vary slightly from the photos. Fit and feel depend on head size, hair type and how you wear it. This guide is for general information only.