
How to Stop Headbands From Hurting
What to wrap around the bottom of a headband to stop it from hurting is a common question for anyone tired of pinching and slipping from stiff accessories. This guide explains how to pad your current pieces and shares a few tips on wearing soft, stretchy fabric bands, including the hand-embroidered linen bands from BabunobGem.
Key highlights
- Learn where stiff headband ends tend to press, such as behind your ears.
- See which soft materials people wrap around stiff ends to cushion them.
- Pick up placement and grip tips for wearing a fabric headband.
- Know when to take a tight accessory off, and when to see a doctor.
Understanding Headband Headaches and Pressure Points
Headbands can hurt when a stiff plastic or metal frame presses against the sides of your head and the skin behind your ears. A band that feels too tight or presses in one spot can be uncomfortable, so take it off if it keeps hurting.
If you have ever found yourself asking why do headbands give me headaches, the answer often comes down to how a rigid frame fits your head. Most traditional headbands, often referred to as Alice bands, are manufactured in a standard U-shape using hard plastic or thick metal wire. However, human heads are not perfectly uniform U-shapes; they are oval, asymmetrical, and vary greatly in width. When you force a rigid frame onto an oval head, the ends of the band naturally squeeze inward to maintain their grip. This inward squeezing can press on the area just behind your ear and along your temples. In short, here is how to stop headbands from hurting, with simple padding and styling ideas.
The skin around your ears and temples is thin, with little padding underneath. When a tight headband presses there for hours at a time, it can create a sore spot. Many people notice soreness when a band feels too tight, which is one reason a headband can feel uncomfortable after a few hours of wear. Headaches can have many causes, so if a band hurts, take it off, and see a doctor if the discomfort continues.
Some people give up on hair accessories entirely because of this discomfort. Understanding the difference between base materials is a useful first step. Hard materials usually rely on clamping force to stay on, while soft, stretchy bands rely on stretch around the head. Choosing a different style may spread the pressure out. If you are rethinking your options, read what are headbands for to find a style that fits your day.
Comparing Headband Materials and Pressure Levels
Not all hair accessories are created equal when it comes to comfort. The base material can affect how much pressure a band puts on your head and how comfortable it feels to wear. Below is a breakdown of common headband types, their base materials, the level of pressure they exert, and the typical issues wearers face. Knowing the types of headbands can make it easier to pick a shape that feels gentler on your head.
| Headband Type | Base Material | Pressure Level | Common Issues |
|---|---|---|---|
| Classic Alice Band | Hard Plastic | High | Can pinch behind the ears and may snap under stress. |
| Wire Frame Band | Metal Alloy | High | Digs into the scalp, rusts over time, pulls fine hair. |
| Knotted Top Band | Fabric over Plastic | Medium to High | Can feel heavy on top, may slide forward, and can press behind the ears. |
| Soft Stretchy Band | Fabric | Varies | Needs good placement and grip to limit slipping. |
| Wide Yoga Wrap | Cotton Blend | Low | Can feel warm, sometimes flattens the hair at the crown. |
| Padded Velvet Band | Velvet over Plastic | Medium | Bulky appearance, still relies on a rigid inner frame. |
| Sports Sweatband | Spandex/Nylon | Medium | Can feel too tight on larger heads, flattens volume. |
| Silk Hair Tie | Silk over Elastic | Varies | Not a headband, but an alternative for tying hair. |
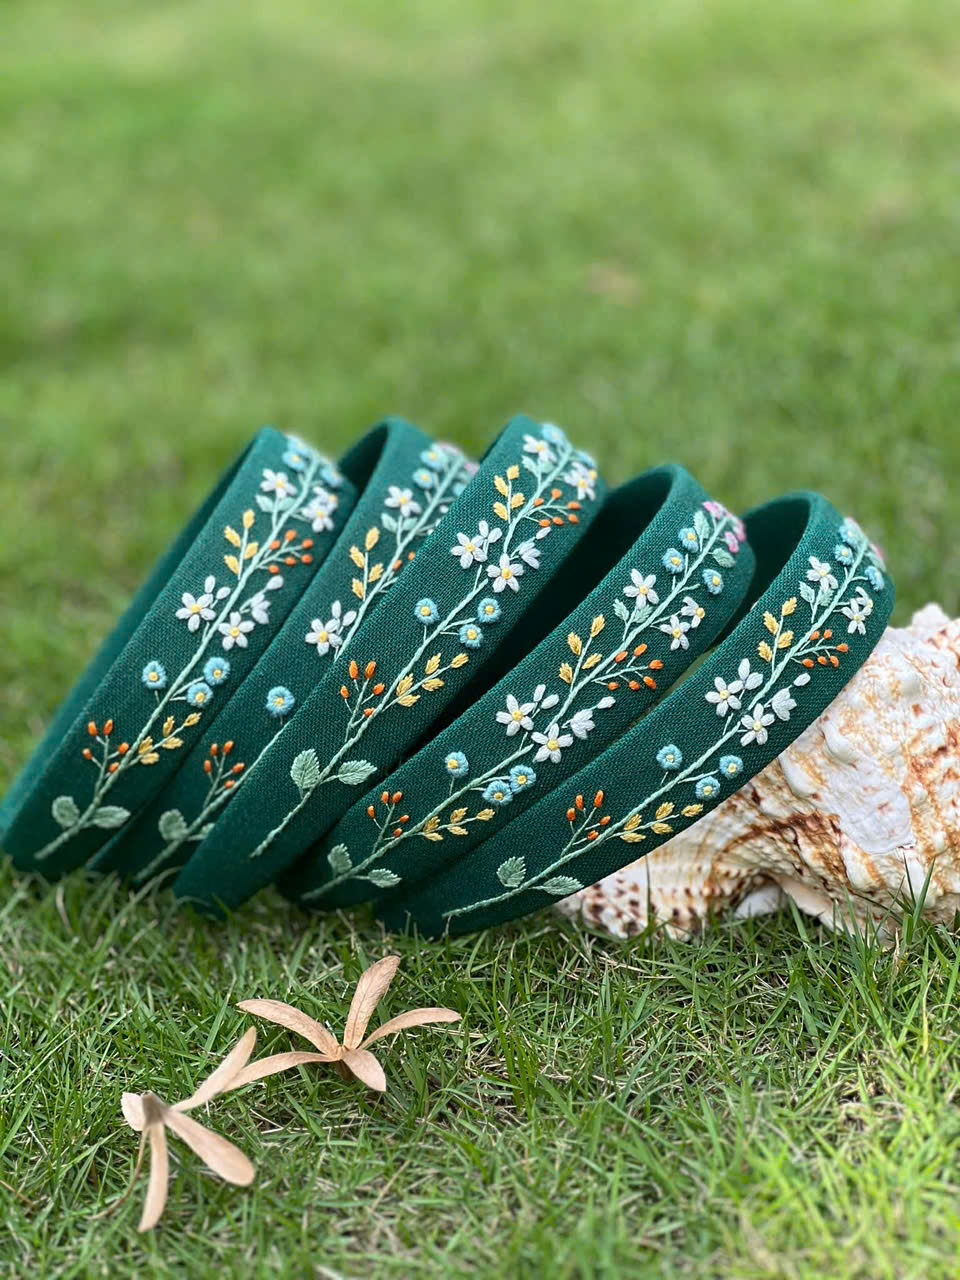
Prefer a fabric band to a stiff frame? Our hand-embroidered headbands are made on natural linen, on a soft, stretchy band that is 1.2 in (3 cm) wide.
What to Wrap Around Bottom of Hairband From Hurting
To cushion a hairband that hurts, you can wrap the bottom tips with soft materials like adhesive moleskin, craft felt, or velvet ribbon. A small cushion on the ends may soften the pressure against the skin behind your ears. If it still hurts, take the band off.
If you have a collection of beautiful but painful plastic or metal accessories, you do not necessarily have to throw them away. Figuring out what to wrap around bottom of hairband from hurting is a simple DIY project that can salvage your favorite pieces. The goal is to create a buffer zone between the hard edge of the accessory and the delicate skin behind your ear. By increasing the surface area of the tip, you diffuse the clamping force over a wider space, which may make the band feel less sharp against your skin. Here is a comprehensive, step-by-step guide on how to make a headband more comfortable using materials you likely already have at home or can easily find at a local craft store.
Step 1: Choosing the Right Padding Material
The first step in modifying a tight headband is selecting a material that is soft and thin. Adhesive moleskin is a common choice. Moleskin is a heavy cotton fabric with a soft, brushed surface and an adhesive backing. It is thin enough not to change the fit of the band much but dense enough to add some cushioning. If you do not have moleskin, craft felt is another option. Felt is soft and easy to cut, though you will need a separate adhesive to attach it. For a more polished look, velvet ribbon is another option. Velvet has a natural grip that can help keep the accessory in place and adds a plush layer against your skin. Avoid using materials like bulky foam or thick rubber, as these can make the ends too thick, pushing the band awkwardly away from your head and ruining its silhouette.
Step 2: Measuring and Cutting the Wrap
Once you have selected your material, you need to measure the exact area that causes discomfort. Put the accessory on your head and pay attention to where it pinches. Usually, this is the bottom one to two inches of the frame. Use a piece of chalk or a washable marker to mark the spot on the band where the pain begins. Take the accessory off and measure the distance from your mark to the very tip. Cut your moleskin, felt, or ribbon to this length. If you are using a flat material like moleskin, cut a rectangular strip that is wide enough to wrap completely around the tip of the band, overlapping slightly on the outside. It is crucial to ensure the padding covers the inner edge, the bottom tip, and the outer edge, as the sharpest corners are often the ones pressing into your skin.
Step 3: Applying the Wrap Securely
If you are using adhesive moleskin, simply peel off the backing and carefully wrap the strip around the bottom of the frame, starting from the inside (the part that touches your head) and folding it over the tip to the outside. Press firmly to smooth out wrinkles and air bubbles, as a wrinkled surface can rub against your skin. If you are using felt or velvet ribbon, you will need a strong, flexible adhesive like fabric glue or a low-heat hot glue gun. Apply a thin, even layer of glue to the inside of the band, press the ribbon down, and then wrap it tightly around the tip. Hold it in place for a few minutes until the glue sets. Allow the modified accessory to dry completely for at least 24 hours before wearing it to help keep the padding from shifting or peeling off when exposed to the natural oils and heat of your skin.
Step 4: Stretching a Tight Headband Gently
Sometimes, padding the ends is not enough if the overall frame is simply too small for your head. In this case, you need to stretch the base material. If your accessory has a metal wire frame, you can gently pull the ends apart with your hands. Do this slowly and in small increments to avoid snapping the wire or distorting the shape permanently. If you are dealing with a hard plastic frame, the process requires more patience. Find a stack of books or a small box that is slightly wider than your head. Carefully stretch the plastic band over the books and leave it there for 24 to 48 hours. The continuous, gentle tension may slowly widen the plastic, loosening its grip, though plastic can crack, so check it often. Combining this stretching method with the padding techniques above may make rigid accessories more comfortable to wear.
How to Wear a Fabric Headband with Less Slipping
To wear a fabric headband with less slipping, place the front edge about an inch behind your natural hairline and set the base low at the nape of your neck. Prepping your hair with a bit of dry shampoo or texturizing spray can also give the fabric more grip.
Even if you switch to soft, flexible accessories, knowing how to wear a fabric headband correctly can make a difference to how it feels. Unlike rigid plastic frames that clamp onto your skull, fabric bands rely on the natural shape of your head and the texture of your hair to stay anchored. Many people struggle with soft bands sliding backward off the crown or riding up at the nape of the neck. This usually happens because the band is placed on the widest part of the head, causing it to naturally slip toward the narrower sections. Learning how to wear fabric headbands involves a mix of proper placement, hair preparation, and choosing the right design for your daily routine. In our studio, we make our headbands on a soft, stretchy band, but how you style it still matters. You can see our soft, stretchy floral headband collection here, made with embroidery on fabric.
Placement and the Natural Hairline One key factor in how to wear cloth headbands is where you position them. A common mistake is pushing the fabric too far back onto the crown of the head. Because the back of the head slopes downward, gravity and movement can cause the band to slide off. Instead, place the front edge of the fabric just about an inch behind your natural hairline. The back of the stretchy band should sit low, right at the nape of your neck, tucked securely underneath your hair. This creates a diagonal angle that follows the natural curve of your head and can help keep the band from riding up. For more help with placement, our guide on how to wear a headband walks through each step.
Prepping the Hair for Extra Grip Clean, freshly washed hair is incredibly slippery, which is why don’t headbands stay on my head is a frequent complaint on wash days. Fabric needs a bit of texture to grip onto. Before putting on your accessory, spray a little dry shampoo, sea salt spray, or texturizing spray at your roots, particularly around your hairline and the nape of your neck. Massage it in to create a slightly matte, grippy surface. If you have very fine or silky hair, you can also lightly tease the hair at the crown and the nape. This invisible texture can give the fabric something to hold onto. For active days, you can see our embroidered running headband collection here.
The Criss-Cross Bobby Pin Technique If you have a highly active day ahead or if your hair is exceptionally straight and fine, you might need a little extra security. The criss-cross bobby pin trick is a staple for keeping soft accessories in place. Once you have positioned the band correctly, take two bobby pins and slide them over the back elastic, right at the nape of your neck, underneath your hair. Cross the pins over each other in an ‘X’ shape. Crossing the pins helps lock them together so they are less likely to slide out. Because this is done underneath the bulk of your hair, the pins usually stay hidden while adding some extra hold for the stretchy band. If a pin presses uncomfortably, remove it.
Distributing Weight with the Right Width The width of the fabric can affect both comfort and stability. Very thin elastic bands may dig in and roll up, while very wide wraps can feel hot and bulky. For example, our hand-embroidered linen headbands are 1.2 in (3 cm) wide, which leaves room for floral embroidery like our roses, daisies, sunflowers, and lavender. You can also see our pearl headband with floral embroidery here, a soft fabric option.
Common Mistakes That Make a Tight Headband Worse
The most common mistakes include wearing a tight headband too far forward on the forehead, ignoring early signs of pain, and consistently pulling the hair back too tightly. These habits can make a headband uncomfortable, so take it off if it hurts, and see a doctor if the discomfort continues.
When trying to figure out how to wear fabric headband styles or how to fix rigid ones, many people inadvertently make mistakes that exacerbate their discomfort. Hair accessories should complement your day, not be a source of distraction or pain. Unfortunately, certain styling habits and purchasing decisions can turn a beautiful accessory into a source of discomfort. Recognizing these pitfalls is just as important as knowing what to wrap around bottom of hairband from hurting. From improper placement to ignoring the physical warning signs your body gives you, here are the most frequent errors we see people make when styling their hair, and how you can avoid them.
Mistake: Pushing the Band Too Far Forward A frequent error is wearing the accessory too far forward, resting it directly on the forehead rather than the hair. While this might look cute for a specific bohemian photo, the forehead slopes downward toward the face. Throughout the day, facial movements, talking, and natural skin oils can cause the band to slide down, requiring readjustment. Furthermore, a tight elastic band across the forehead can feel uncomfortable, so loosen it or take it off if it starts to hurt. One fix is to anchor the accessory in your hair, utilizing the natural texture of your strands and the shape of your skull to hold it in place.
Mistake: Ignoring Pain From a Tight Headband Many people put up with a tight headband, assuming that looking good takes a bit of discomfort. It does not have to. According to the American Academy of Dermatology, hair pulled back tightly over and over can cause traction alopecia. If an accessory leaves red marks on your skin, gives you a headache, or makes your scalp feel sore, take it off. If the discomfort continues, see a doctor or dermatologist. You can also try padding the ends or stretching the band, or choose a soft, stretchy fabric band that does not rely on pulling. If you like a vintage look, you can also browse our guide to retro headbands.
Mistake: Choosing the Wrong Base Material for Your Lifestyle Another common mistake is buying an accessory based solely on its appearance without considering the base material and how it fits into your daily routine. A heavy, jewel-encrusted metal band might look stunning, but it is entirely impractical for a long day at the office or running errands. Heavy accessories may need a tighter grip to stay on, which can be uncomfortable. Similarly, a thick velvet padded band in the middle of summer can feel hot. The fix is to match the material to your activity. For everyday wear, many people like lightweight fabrics such as linen or cotton, which can feel less bulky than a rigid frame.
what to wrap around bottom of hairband from hurting FAQ
Why do headbands give me a headache?
A rigid plastic or metal frame that presses on the sides of your head or behind your ears for hours can feel uncomfortable, and a band that is too tight can leave you feeling sore. Headaches can have many causes, so if a headband hurts, take it off, and see a doctor if the headaches or discomfort continue. A softer, stretchy fabric band may feel less rigid, though fit and feel depend on head size and how you wear it.
Why don’t headbands stay on my head?
Headbands often slide off because they are placed incorrectly on the widest part of the head, causing them to slip down the natural slope of the skull. Additionally, freshly washed, silky hair lacks the texture needed for the fabric to grip. To keep them in place, position the front just behind your hairline, anchor the back at the nape of your neck, and use a bit of texturizing spray for added grip.
How to make a headband more comfortable quickly?
To make a rigid headband more comfortable quickly, you can stretch the frame gently over a stack of books for 24 hours to widen its grip. Additionally, you can wrap the bottom tips with adhesive moleskin, craft felt, or velvet ribbon. This padding adds a soft buffer between the hard edge of the accessory and the skin behind your ears, which may spread out the pressure.
How to wear cloth headbands if I have fine hair?
If you have fine hair, cloth headbands can easily slip. To prevent this, prep your roots with dry shampoo or sea salt spray to create a matte, grippy texture. Place the band correctly at the hairline and the nape of the neck. For extra security, use the criss-cross bobby pin technique: slide two bobby pins over the back elastic at the nape of your neck in an ‘X’ shape to lock the band in place.
Can wearing a tight headband cause hair loss?
Yes, hair pulled back tightly over and over can cause traction alopecia, a type of hair loss. If your accessory feels painfully tight, leaves red marks, or makes your scalp sore, take it off. If the discomfort continues, see a doctor or dermatologist.
Finding Your Everyday Hair Accessory
Understanding what to wrap around bottom of hairband from hurting can help you keep using your favorite rigid accessories, and a fabric band is another option. At BabunobGem, our hand-embroidered linen headbands are made on a soft, stretchy band, crafted in small batches in Ho Chi Minh City, Vietnam, and usually prepared in 1–3 business days. If any accessory hurts, take it off, and see a doctor if the discomfort continues. Keeping your bands in good shape matters too, so see how to store headbands between wears.
New here? Get 10% off your first order
Join our list for new small-batch designs and restocks, or browse the collection now.
Note: Each piece is embroidered by hand, so stitches and colors can vary slightly from the photos. Fit and feel depend on head size, hair type and how you wear it. This guide is for general information only.