
How to Use a Hair Tie for Ponytails
How to use a hair tie well comes down to choosing a material you like and learning a simple wrapping technique. This guide walks women through preparing hair, stretching a new tie, wrapping a ponytail and avoiding common mistakes, with practical tips from our BabunobGem hand-embroidery studio in Vietnam.
Key highlights
- Bare rubber can drag on hair when you take it out, so a fabric-covered tie or scrunchie is worth trying.
- Stretch a stiff new hair tie gently before the first use so it wraps more easily.
- Wrap the tie as many times as your hair thickness and the tie’s stretch call for, often two or three.
- Spot clean embroidered hair accessories with a damp cloth and let them air dry, rather than soaking them.
Understanding Hair Ties and Ponytail Mechanics
To use hair elastics effectively, you need to understand how different materials interact with your hair type and how much tension is required to hold a ponytail in place.
Before you learn how to tie a hair tie properly, it helps to look at the accessory itself. Many hair ties have an elastic core with an outer covering. The elastic provides the stretch and tension that hold the hair together, while the covering affects how much friction your hair strands feel. A tie with a rough or sticky surface grips the hair tightly but can snag when removed. A smooth fabric covering glides over the hair, so you may need to adjust the wrap count to keep a ponytail from slipping. If your ponytail still slides down, read our tips on choosing a scrunchie for thin hair.
In our studio, we often talk about the shift from bare rubber bands to fabric-covered options. Materials like linen, silk and cotton each look and feel a little different in a ponytail. Linen has a natural, slightly textured look that suits casual cottagecore styles, while silk is smooth and glossy. Knowing these differences helps you choose an accessory that fits your routine and hair texture. For a closer look at each option, see our guide to the types of hair elastics.
Comparing Common Hair Tie Materials
When you are learning how to use hair ties, what you put in your hair matters almost as much as the technique. Different materials suit different jobs, from holding a workout ponytail to tying off a loose braid before bed. Below is a quick comparison of common materials, their texture and how to care for them. We also answer a common question in detail: are cotton scrunchies good for hair, and how do they compare with silk?
| Material Type | Texture | Common Use Case | Care Method |
|---|---|---|---|
| Bare Rubber | Plain, smooth rubber | Sectioning small braids | Discard when brittle |
| Cotton-Coated Elastic | Matte fabric cover | Everyday casual wear | Replace when stretched |
| Silk Scrunchies | Smooth and glossy | Polished, dressier looks | Spot clean with damp cloth |
| Linen Scrunchies | Slightly textured | Textured, natural looks | Spot clean, air dry |
| Velvet Scrunchies | Plush pile | Cozy, vintage looks | Spot clean gently |
| Spiral Plastic | Smooth plastic coil | Wet hair or swimming | Reshape in warm water |
| Button Hair Ties | Embroidered detail | Adding decorative details | Spot clean around embroidery |
| Seamless Nylon | Smooth, flat band | Fine to medium hair | Wash with mild soap |
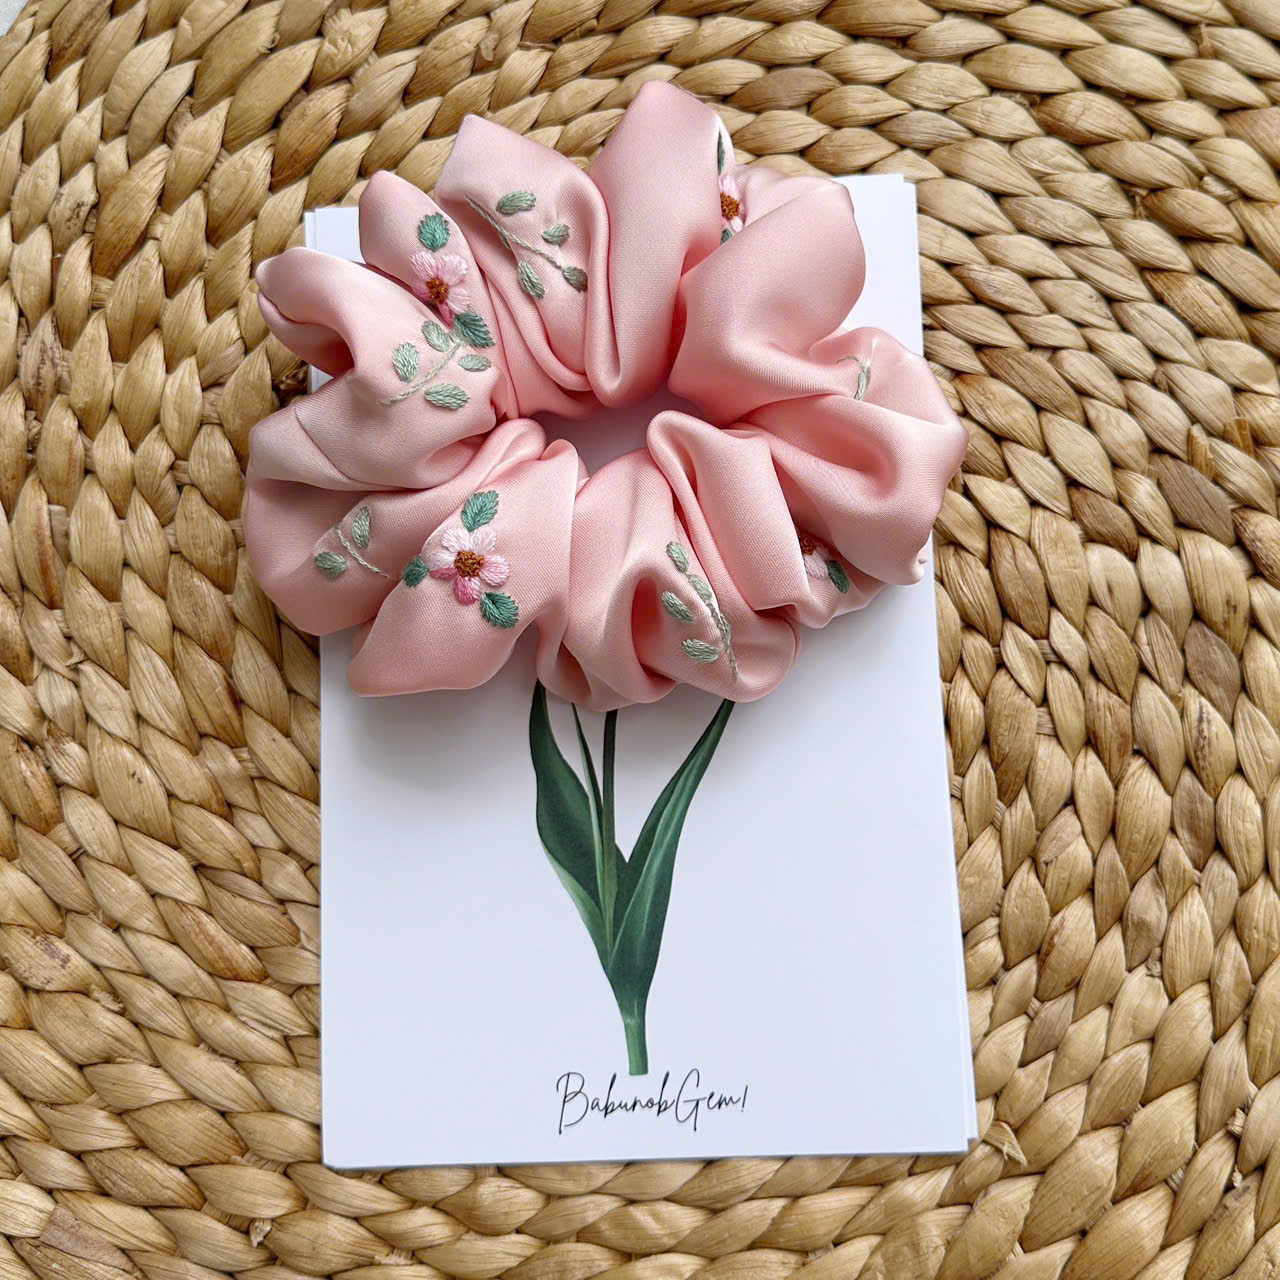
If standard elastics snag your hair when you take a ponytail down, a fabric scrunchie may be worth trying. The Wildflower Silk Scrunchie is hand-embroidered with wildflowers.
How to Tie Your Hair with a Hair Tie: A Step-by-Step Guide
To tie your hair with a hair tie, gather your hair into the desired position, hold it with one hand, and use your other hand to slide the tie over the hair, twisting it into a figure-eight and pulling the hair through until secure.
Step 1: Prepare and Detangle Your Hair
A good ponytail starts before you even pick up an accessory. Begin by brushing or combing your hair to remove any tangles or knots. If you have straight or wavy hair, a boar bristle brush can help gather the hair neatly. For curly or coily hair, finger-detangling or using a wide-tooth comb while the hair is slightly damp can help keep your natural texture and cut down on frizz. Good preparation helps when you figure out how to put your hair up with a hair tie, because the hair feeds more smoothly through the elastic and you are less likely to end up with uneven tension or stray loops. If you have curly hair, our guide to hair ties for curls explains how to secure it loosely without flattening the pattern.
Step 2: How to Stretch Out Hair Ties Before Use
A common issue with brand new elastics is that they can be stiff, which makes them harder to wrap and can leave them pulling on the scalp. If you are wondering how to stretch hair tie materials safely, the key is gentle, manual stretching. Hold the tie with both hands and give it a few controlled pulls, taking care not to overstretch it until it snaps. Learning how to stretch out hair ties properly can help loosen a stiff elastic so it wraps around your hair more easily.
Step 3: Gather and Position the Ponytail
Decide where you want your ponytail to sit: high on the crown, in the middle of the back of your head, or low at the nape of your neck. Use both hands to sweep your hair back, smoothing the sides and the top. Once the hair is gathered, hold the entire bundle in your dominant hand. The placement of your ponytail affects how the weight of your hair is distributed. A high ponytail often needs an extra wrap to resist gravity, while a low ponytail can usually be tied more loosely, for example with a fabric scrunchie. If you wear bangs, these fringe and ponytail styles show how to balance the front and the back.
Step 4: Wrap and Secure the Hair Tie
Now comes the core motion of how to tie hair ponytail styles. Transfer the gathered hair to your non-dominant hand. With your dominant hand, stretch the hair tie open and slide it over the bundle of hair, pulling the hair completely through the loop. Next, twist the hair tie to create a figure-eight shape. Fold that new loop over the bundle of hair and pull the hair through again. Depending on the thickness of your hair and the stretchiness of the tie, you can repeat this twisting and pulling motion two or three times. The goal is a hold that feels secure but does not pull sharply on your roots.
Step 5: Adjust for Volume and Comfort
Once the tie is in place, you may want to adjust the style. If the ponytail feels slightly loose, you can gently split the ponytail into two sections and pull them outward in opposite directions; however, do this very carefully to avoid tightening the elastic too much against the scalp. To add volume or a more relaxed, boho look, use your fingertips to gently tug at the hair above the tie, loosening the roots slightly. This step softens the overall look and can ease the pull at your roots.
Studio Tips for a Better Ponytail Experience
A few small habits can help: vary where you place your ponytail, choose a fabric-covered accessory if bare elastics tug at your hair, and spot clean embroidered pieces gently.
In our studio, we hand-embroider accessories in small batches, mainly on natural linen. A ponytail that sags or an accessory that loses its shape is a common frustration, so here are four habits we like to share. They apply whether you wear a simple button hair tie or an embroidered scrunchie.
Layering for heavy hair: If you have very thick or heavy hair and find that a fabric scrunchie slips, try a layering technique. First, secure your ponytail with a basic, seamless nylon elastic that matches your hair color. Then, wrap your decorative linen or silk scrunchie over the top. The base elastic does the holding, while the scrunchie adds the cottagecore look and hides the plain tie underneath. The same trick works at the end of a plait, so see how to pick a scrunchie for braids.
Spot cleaning embroidered pieces: Hand-embroidered accessories require a gentle touch. We recommend spot cleaning only. If your linen scrunchie or button tie gets a makeup smudge or sweat mark, dampen a soft cloth with cool water and dab the area gently. Avoid rubbing the embroidery threads, and always let the piece air dry flat. Do not put them in the washing machine, as the agitation can distort the fabric and loosen the hand-stitched details.
Varying your ponytail height: To avoid putting the same strain on one spot, try not to wear your ponytail in the exact same place every day. Alternate between a high ponytail, a mid-level style and a low nape ponytail. Changing the spot gives the hair in any one area a break from the pull of the tie. A braid is another way to rest your roots, and our guide on how to do a dutch braid on yourself walks through each step.
Leaving face-framing pieces: For a softer, more vintage-inspired look, pull a few small strands of hair loose around your face and ears before you finalize the wrap. This frames the face and leaves the finest hairs along your hairline free instead of pulled back, so the style can feel less rigid. For more retro inspiration, look through these 90s hairstyles with scrunchies.
Common Ponytail Mistakes to Avoid
Common mistakes when tying a ponytail include pulling the hair too tight, ripping the tie out roughly, and tying wet hair with narrow elastics.
Even with the right accessories, some habits can leave your scalp sore or your hair dry and tangled. Many people fall into them out of convenience. By spotting these common errors, you can adjust your routine to be easier on your hair. Here are three common mistakes and how to correct them.
Mistake: Tying the hair too tightly. When you wrap an elastic one too many times to get a rigid hold, the pull adds up. The American Academy of Dermatology notes that hair pulled back tightly over and over can cause traction alopecia, a type of hair loss. If you feel a pulling sensation or a headache starting, take the tie out and loosen your hair, and see a doctor if it continues or a dermatologist if you notice thinning. The fix is to wrap the tie fewer times and let the ponytail sit looser, even if it sits a little lower.
Mistake: Ripping the tie out of your hair. At the end of a long day, it is tempting to grab the hair tie and pull it straight down the length of your ponytail. This can tug and snap strands, especially with a bare rubber or worn-out cotton elastic. Instead, take a few extra seconds to gently unwind the tie, reversing the figure-eight motion you used to put it in.
Mistake: Tying wet hair with narrow elastics. Wet hair is more fragile and stretchy than dry hair, so a thin, tight hair tie can pull on it more easily. If you must tie your hair up while it is damp, try a wide fabric scrunchie or a claw clip instead, and keep the style very loose.
How to Use a Hair Tie FAQ
How many times should I wrap a hair tie?
The number of wraps depends on the thickness of your hair and how stretchy the tie is. With medium hair, two or three wraps are often enough to keep a ponytail in place. Very fine hair may need a wrap or two more, while very thick hair may only fit two. The goal is to wrap it just enough that the ponytail does not sag, but not so many times that it pulls on your scalp.
How do I stop my ponytail from sagging?
A sagging ponytail usually happens when the hair tie lacks grip or the hair is too heavy for a single elastic. To fix this, try a tie with a textured cover, such as velvet or linen, which can give your hair a little more to grip, although results vary. Alternatively, you can use the layering trick: secure the hair first with a strong, seamless nylon tie, and then place your decorative scrunchie over it to hide the base.
Can I sleep with my hair tied up?
A tight ponytail is a poor choice for sleep, because the pull of the elastic plus the pressure of a pillow can be uncomfortable. If you prefer to keep your hair out of your face at night, try a very loose braid with a fabric scrunchie at the end, or a loose topknot tied with minimal tension. If you wake up with a sore scalp or a headache, take the tie out, and see a doctor if it continues.
How to stretch a hair tie that is too tight?
If a new elastic feels uncomfortably tight, you can stretch it manually before wearing it. Hold the tie firmly with both hands and pull outward gently several times. You can also wrap the new hair tie around a cylindrical object, like a water bottle or a rolled-up magazine, and leave it there for a few hours or overnight. This can help the elastic relax a little.
Are scrunchies better than regular hair ties?
It depends on what you need. A scrunchie has a fabric cover that is wider than a thin elastic, which often leaves fewer creases and dents, although results vary with your hair type and how tightly you wrap. Regular elastics are useful for sports or for sectioning intricate styles, since they sit flat and tight. It is easy to keep both and choose based on the style of the day.
Finding Your Everyday Hair Accessories
Learning how to use a hair tie well is a small step that can make daily styling easier. Choose a material you like, stretch a stiff new tie gently, and keep your ponytail loose rather than tight. At BabunobGem, we hand-embroider hair accessories in small batches in our Ho Chi Minh City studio, including scrunchies and button hair ties for anyone who likes a touch of cottagecore style in their everyday ponytail.
New here? Get 10% off your first order
Join our list for new small-batch designs and restocks, or browse the collection now.
Note: Each piece is embroidered by hand, so stitches and colors can vary slightly from the photos. Fit and feel depend on head size, hair type and how you wear it. This guide is for general information only.