
Cute Twist Ponytail Styles for Everyday
Twist ponytail styles offer a simple, charming way to upgrade your everyday hair routine with soft visual dimension and minimal morning effort. Designed for busy women seeking practical elegance, this guide from BabunobGem breaks down wearable variations, gentle holding techniques, and botanical accessory pairings for relaxed, polished everyday hair.
Key highlights
- Master fundamental mechanics like opposing counter-twists and inverted flips to create dependable everyday hairstyles.
- Discover step-by-step styling methods for low rope braids, crown twists, and textured topsy ponytails.
- Learn gentle sectioning habits that go easy on your roots and avoid pulling hair tight over and over.
- Pair functional hairstyles with hand-embroidered linen accessories to bring relaxed cottagecore charm to daily routines.
Understanding Everyday Twist Ponytail Styles and Mechanics
Twist ponytail styles combine directional hair tension with rotating sections to create textured, dimensional ponytails that can hold their shape without complicated braiding. Unlike three-strand braids that interlock flat, twisted styles rely on two-strand torsion or inverted loops to frame the face and elevate basic low, mid, or high ponytails.
Some women find standard ponytails practical but visually plain. Traditional braids can take time and often feel formal or rigid. Twisted styles bridge this gap by offering organic movement with simple hand motions. Whether you favor a relaxed cottagecore look or clean workday simplicity, understanding how hair strands wrap around one another helps you style with confidence.
The Structural Mechanics: Torsion, Inversion, and Friction
Traditional three-strand braids interlock hair sections at alternating angles, producing a relatively flat ribbon of woven hair. In contrast, twist ponytail styles rely on rotational torque and surface friction between two sections. When you create an inverted flip, often called a topsy ponytail, the hair rolls inward over itself, using the natural weight of your gathered strands to anchor the shape. A two-strand rope twist, meanwhile, requires twisting individual sections along their own axis before winding them around each other in the opposite direction. Understanding this mechanical difference helps you troubleshoot styles that feel loose or begin to unravel before midday.
Selecting Base Accessories Based on Hair Density and Texture
Every hair density interacts uniquely with twisted ponytail structures. Fine hair tends to slip when twisted, so fabric-covered hair ties may grip better than slick, seamless elastics that slide down the shaft. Thick hair holds rotational shape well but puts more weight on the base, so wider bands or oval barrettes may help spread that weight across the nape. For wavy or curly textures, the natural strand pattern grips easily, so you can use softer accessories like natural linen scrunchies or fabric button ties without much tension. Choosing an accessory that suits your hair density can help limit mid-day sagging and keep your twist looking intentional. To compare your options, our overview of types of hair elastics explains how different bands behave.
Everyday Aesthetic Styles: From Cottagecore Texture to Polished Workday Ponytails
Twist ponytails bridge the gap between casual ease and intentional styling across diverse everyday settings. For relaxed days at home, school drop-offs, or weekend farmer’s markets, a loose crown twist paired with an embroidered linen headband can create an effortless botanical cottagecore look. In professional work environments, a low ponytail finished with a neat rope twist or an inverted fold offers clean lines without stiffness. By adjusting how tightly you gather the sections and selecting complementary hairpieces, you can adapt a single basic twist technique to suit morning meetings, casual family outings, or relaxed evening dinners with friends throughout the week. If you like face-framing bangs, our fringe and ponytail ideas show how to pair them with a twist.
| Twist Ponytail Variation | Difficulty & Rough Time | Suitable Hair Texture | Recommended Accessory Pairing |
|---|---|---|---|
| Classic Inverted Topsy Pony | Beginner (2 min) | Shoulder-length or longer, fine to thick | Linen scrunchie or mini clear tie |
| Two-Strand Rope Twist Braid | Beginner to Intermediate (4 min) | Medium to long hair, fine to thick | Base hair tie + mini end elastic |
| French Side Twist Low Pony | Intermediate (5 min) | Medium to long hair, straight to wavy | Oval linen-wrapped barrette or claw clip |
| Crown Double Rope Twist Pony | Intermediate (5–6 min) | Shoulder-length to long, layered hair | Floral embroidered snap clips or scrunchie |
| Segmented Bubble Twist Pony | Beginner (5 min) | Long hair, straight or wavy textures | Mini elastics + botanical hair tie set |
| Half-Up Twist Transition Pony | Beginner (3 min) | Bob to long hair, fine or medium density | Hand-embroidered claw clip or barrette |
| Criss-Cross Wrapped Nape Pony | Intermediate (4 min) | Medium to thick hair, shoulder-length+ | Embroidered button hair tie or scrunchie |
| Sleek High Rope Twist Pony | Intermediate (5 min) | Long straight or smoothed curls | Firm base tie + linen scrunchie accent |
| Relaxed Bohemian Low Twist | Beginner (3 min) | Wavy or textured hair, fine to thick | Embroidered headband + soft hair tie |
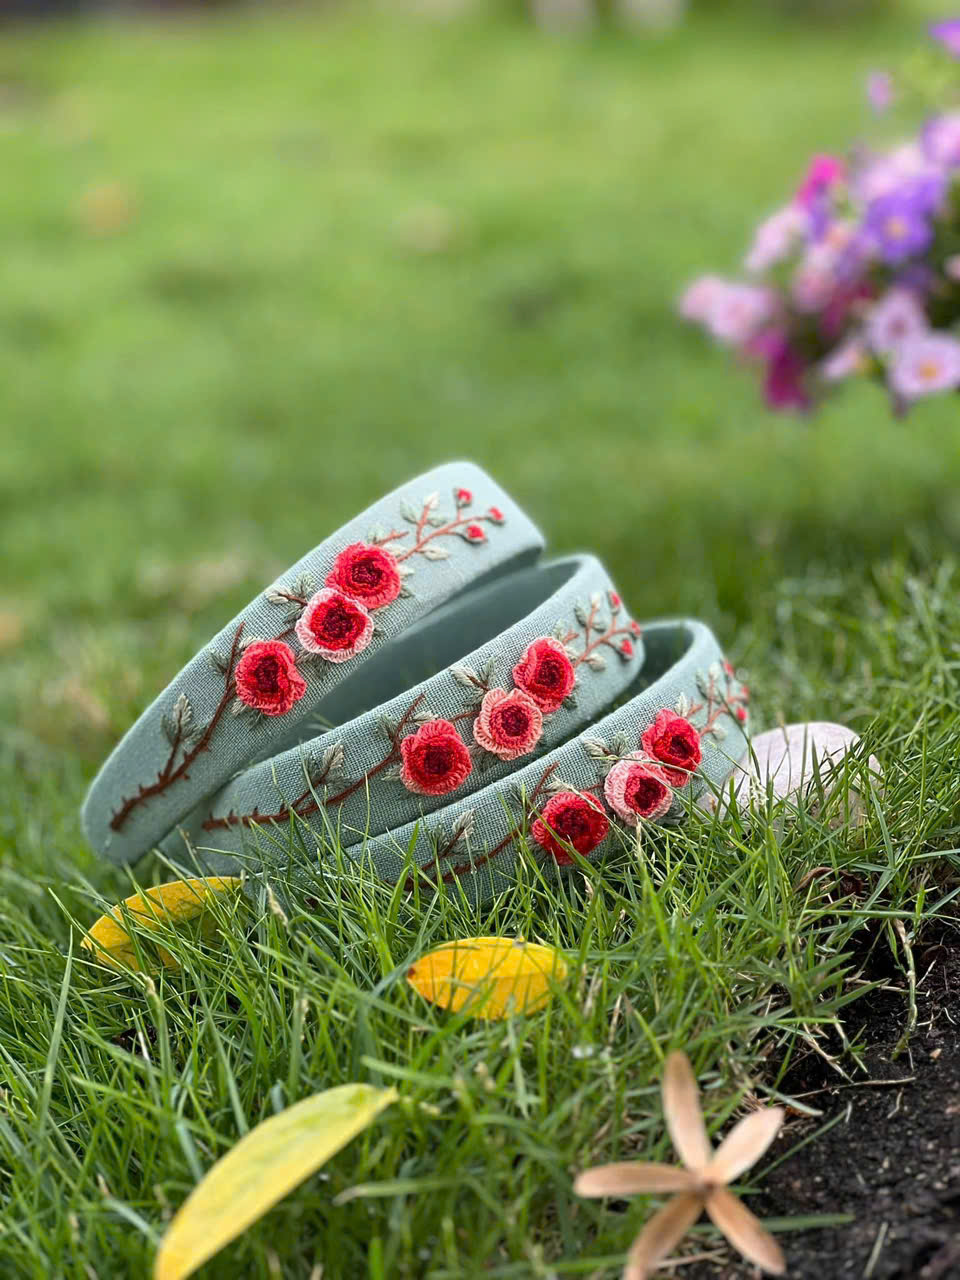
The Everyday Hair Set – Embroidered Headband, Scrunchie & Hair Ties
This set brings together an embroidered headband, scrunchie, and hair ties, a botanical touch to complete your everyday twist ponytails.
How to Do a Twisted Ponytail: Step-by-Step Everyday Variations
To do a twisted ponytail, gather detangled hair at your chosen height, secure a stable base, and apply opposing rotational tension to lock the strands together. Mastering fundamental variations like the inverted flip, the two-strand rope braid, and the side crown twist can help you build charming everyday looks in a few minutes.
Learning how to do a twisted ponytail does not require professional salon skills. With a clear sequence and deliberate finger positioning, you can create balanced shapes at home. Below is a step-by-step guide to preparing your hair, building foundational twists, and securing them with mindful care.
Step 1: Prep Hair Texture and Establish a Gentle Foundation
A twist ponytail that holds up begins before you touch an elastic. Second-day hair often holds twists better than freshly washed hair because natural oils provide subtle grip. If your hair was just washed and feels slick, apply a light texturizing mist or a dusting of dry shampoo through the mid-lengths. Gently brush through your hair from the ends upward toward the roots to clear any tangles without snapping fragile fibers. Avoid heavy styling waxes or greasy serums, which can make twists slide apart early. A clean, lightly textured base can help sections cling together through the day. If you need a refresher on securing the base, read how to use a hair tie in our guide.
Step 2: How to Do a Twisted Ponytail with an Inverted Topsy Flip
The inverted topsy flip is a quick and popular twist ponytail style for daily wear. Begin by gathering your hair into a low or mid ponytail using a soft elastic. Loosen the elastic slightly by sliding it down about an inch from your scalp. Using your index and middle fingers, part the hair above the band to create a neat vertical tunnel. Lift the ponytail up, tuck the tail down through the opening, and pull it through completely. Gently pull the tail apart into two sections to slide the elastic upward and tighten the rolled edges. Finish by gently patting the side rolls outward to help conceal the inner elastic.
Step 3: How to Build a Twisted Ponytail Braid Using the Counter-Twist Method
To construct a twisted ponytail braid, secure your hair at the crown or mid-head with a base tie. Split the gathered ponytail into two equal halves. Twist the right-hand strand clockwise between your fingers until it forms a firm cord. Next, twist the left-hand strand clockwise in the exact same direction. While keeping both individual strands twisted to the right, cross the right strand over the left strand toward the left. Continue this rhythmic sequence down the entire length, twisting right and crossing left. Fasten the bottom with a small elastic, locking the opposing tensions into a tidy rope. This mechanical counter-twist can help keep the rope from uncoiling during everyday movement. For a related technique, see how to do the ponytail braid in our other tutorial.
Step 4: Crafting the Cottagecore Side-Crown Twist into a Low Ponytail
For an airy cottagecore aesthetic, incorporate romantic side twists along your hairline. Create a soft center or side part, then separate a two-inch section of hair near your temple into two smaller pieces. Twist the front piece over the back piece away from your face. Pick up a fine slice of hair along your hairline, combine it with the front piece, and twist again. Continue feeding small sections along the side of your head toward your nape. Repeat on the other side, then gather both twists and remaining loose hair into a low ponytail secured with a soft band. This framing detail can soften the look of your face while keeping front strands neatly swept back. Half-and-half looks are covered in ponytail and hair down, if you want to leave some strands loose.
Step 5: Securing the Tail and Adding Fabric Accessories
Once your ponytail base is established, the finishing accessory you choose can affect both comfort and visual charm. Traditional rubber bands can pull hair during removal, while uncovered plastic spirals may snag delicate strands. Fabric-covered accessories are another option. At BabunobGem, we make linen scrunchies and embroidered button hair ties that pair botanical needlework with everyday use. A linen scrunchie slipped over the ponytail base adds a decorative finish. Slide the fabric accessory directly over your base tie, so the embroidered flowers sit on the outside without extra tightening. You can see our hand-embroidered silk scrunchie here for a floral finishing touch.
Step 6: Softening the Silhouette with Gentle Pinching and Nape Adjustments
The final step transforms a stiff, structured ponytail into a relaxed, feminine hairstyle. With one hand supporting the base of your ponytail, use your other thumb and index finger to gently pinch and loosen individual outer loops along your twists. This technique, often called pancaking, can expand the visual volume of the twist without loosening the base. Tug lightly on hair at the crown to add subtle height, and ease a few delicate wisps around your temples and ears. These soft adjustments create an unhurried, lived-in look, helping your ponytail appear effortless rather than overly rigid. For a looser finish, our messy ponytail guide shows more relaxed ways to style the tail.
When choosing holding accessories, consider how materials interact with your hair fibers:
- Standard rubber bands: Offer strong initial grip but can cause friction breakage during removal.
- Spiral plastic coils: Water-resistant and functional, though they can tangle in fine curls or stretch out over time.
- Silk and satin wraps: Smooth finish that some people find less rough on hair, though ultra-fine hair may slide out during active movement.
- Hand-embroidered linen accessories: Natural linen has a textured surface and adds distinctive artisan detail.
Studio Styling Tips for Everyday Twist Ponytails
Studio styling tips focus on mechanical counter-twisting, two-finger loop placement, and layering decorative fabric over structural ties for a hold that avoids pulling on the scalp. Gentle handling habits can also go easier on both your hair and your hand-embroidered accessories.
In our studio, we hand-embroider botanical motifs onto natural linen. Here are a few practical tips for styling twist ponytails with fabric accessories.
The Counter-Directional Lock Technique When styling a twisted ponytail braid, one useful way to help prevent unraveling is maintaining opposing rotational forces. Always twist the two individual strands in one direction (for example, clockwise) while wrapping them around each other in the opposite direction (counter-clockwise). This mechanical friction can make the strands tighten against each other as you move, helping keep the twist neat without drowning your hair in stiff holding sprays.
The Two-Finger Loop Grip for Inverted Flips When making an inverted topsy ponytail, avoid pushing your entire hand through the hair above the elastic, which creates messy holes and exposes your scalp. Instead, use your index and middle finger from underneath to separate the strands gently. Grasp the end of your ponytail between these two fingers and pull it down through the opening. This produces a tidy roll and conceals the inner elastic cleanly.
Layering Structural Ties Under Decorative Linen If you have thick or heavy hair, use a plain, soft elastic as your foundational anchor first. Then, layer a hand-embroidered linen scrunchie or a floral button hair tie directly over the base. With this layering, the plain elastic does the holding while the embroidered linen sits on top as an artistic accent.
Careful Maintenance for Second-Day Twists and Embroidery You do not need to wash your hair to revive a flattened twist ponytail. Lightly mist your lengths with water, re-twist the sections, and fluff the rolls with your fingertips. For your embroidered hairpieces, avoid machine washing. If a linen scrunchie or headband collects makeup or dust, spot clean it gently using a damp cloth and allow it to dry flat naturally away from direct sunlight.
Common Mistakes That Ruin Twist Ponytail Styles
Common twist ponytail mistakes include pulling hair too tightly at the scalp, wrapping sections in matching directions, and relying on uncovered metal hardware that can snap delicate strands. Avoiding these pitfalls can ease tension at your hairline and help your twisted styles look balanced through the day.
When a hairstyle feels uncomfortable or slips out of place, minor adjustments in technique can make a world of difference. Being aware of tension habits and hardware choices can help you go easy on your hair and avoid frustration during morning styling.
Mistake: Pulling Root Sections Too Tightly for Hold Gathering your hair with severe tension around the hairline might feel secure at first, but it can lead to scalp tenderness and tension headaches. The American Academy of Dermatology notes that hair pulled back tightly over and over can cause traction alopecia. To go easy on your hair, keep the base of your twist relaxed, leave soft tendrils around the temples, and avoid sleeping in a tight ponytail. If you experience scalp soreness or headaches, take your hair accessories off, and see a doctor or dermatologist if it continues.
Mistake: Twisting Individual Strands in the Same Direction as the Wrap A common reason a twisted ponytail braid comes undone within minutes is matching the twist direction to the wrap direction. If you twist both strands clockwise and then wrap them clockwise around each other, the fibers naturally unwind with everyday head movements. Always twist individual sections clockwise, then wind them counter-clockwise. This opposing tension creates friction that can help the rope keep its shape through busy workdays.
Mistake: Using Bare Metal Hardware or Exposed Rubber Elastics Securing a delicate twist with uncovered rubber bands or sharp metal barrettes can snag fragile strands and cause breakage. Metal clips can also slide down smooth hair, flattening the visual volume of your twist. Consider fabric-covered accessories instead of bare metal hardware, such as linen-covered snap clips (a set of 6, about 7 cm each), scrunchies, or hand-embroidered claw clips. You can browse our handmade hair ties here, including fabric styles that cover the elastic.
Twist Ponytail Styles FAQ
How do I prevent my twisted ponytail braid from unravelling by midday?
To help your twisted ponytail braid stay in place, apply the counter-twist technique: twist both sections clockwise individually, then wind them counter-clockwise around each other. Use a tiny, soft elastic at the very end rather than leaving it loose. If your hair is silky or freshly washed, add grip by misting a small amount of texturizing spray or dry shampoo before twisting. Finishing the style with a linen scrunchie at the base may add light friction that helps keep the top of the twist from sliding loose.
Can I do twist ponytail styles on short or layered hair?
Yes, twist ponytail styles can work well on shoulder-length hair and layered cuts. For shorter lengths, a low inverted ponytail or a half-up twist ponytail is a good option. Because shorter layers may poke out of a full rope braid, try twisting small side sections along the hairline into a half-up style first, then gather the remaining hair at the nape. Using linen-covered snap clips or hand-embroidered claw clips can help tuck in shorter stray ends while adding a charming handmade detail.
Are twist ponytail styles gentler on the scalp than regular ponytails?
Twist ponytail styles can feel gentler on the scalp than tight traditional ponytails because the tension is spread across rolled sections rather than pulling straight back from the hairline. Low inverted twists and relaxed rope braids can sit comfortably at the nape of the neck, which may reduce downward drag. For more comfort, keep the base elastic slightly relaxed and choose fabric-covered ties or natural linen accessories instead of narrow, tight bands. If your scalp feels sore, take the style down, and see a doctor or dermatologist if it continues.
What is the easiest way to hide a hair elastic in a low twisted ponytail?
One easy method to conceal an elastic is the inverted topsy flip, where the hair naturally rolls inward and tucks the elastic out of sight. Alternatively, take a small half-inch strand from underneath the ponytail, wrap it snugly around the base elastic until it is covered, and pin the tail underneath with a small bobby pin. You can also slip a decorative natural linen scrunchie or an embroidered button hair tie over the base for an effortless botanical accent.
How do I care for hand-embroidered hair accessories used with twist styles?
To care for hand-embroidered linen accessories, treat them gently and avoid machine washing or soaking in water. If your scrunchie, headband, or hair tie gathers makeup, oils, or dust, simply spot clean the soiled area using a clean, damp cloth. Gently dab the linen without rubbing the embroidery stitches vigorously, then lay the piece flat to air dry naturally away from intense sunlight. This mindful routine can help your accessories look fresh for daily wear.
Embracing Handmade Details in Everyday Hairstyles
Everyday styling can be calming and creative. Cute twist ponytail styles let you enjoy textured, elegant shapes without complicated routines or harsh tension. At BabunobGem, we hand-embroider natural linen hair accessories in small batches, offering thoughtful accents for your daily rituals. Orders are usually prepared in 1–3 business days, and US delivery is estimated at 10–14 business days, with tracking. Returns within 30 days under our Return Policy.
New here? Get 10% off your first order
Join our list for new small-batch designs and restocks, or browse the collection now.
Note: Each piece is embroidered by hand, so stitches and colors can vary slightly from the photos. Fit and feel depend on head size, hair type and how you wear it. This guide is for general information only.